X2 Controls and Ergonomics
Always evolving, but has to start somewhere...
There’s a lot to be said in the broader world of ergonomics; entire courses on things like Human Computer Interaction, various engineering sub-disciplines, professional consultants for both office space and for bikes, with ‘professional fitting services’ available for bike fitting and adjustments.
In layman’s terms, ergonomics is about human/machine ‘interfaces’ and alignment so that the human can work most effectively, efficiently and comfortably without causing undue strain (e.g. things like carpal tunnel for many occupations), while enabling them to get the ‘required job’ - done.

What does this have to do with bikes?
Being comfortable with well-positioned, accessible controls, on a bike that fits you properly can make an enormous difference on long rides, easily letting you ride longer with less fatigue. When a bike simply does not fit, or the controls are ill-positioned, it can even cause a dangerous situation, such as missing grabbing the brake level quickly and confidently in an emergeny situation, or taking additional time to try to re-position your hands or body when terrain just took a surprise unexpected turn.
I’ve spent a lot of time on ergonomics, from college study to daily work in technology, as well as decades of riding motorcycles on and off-road, and much of the same applies equally to bicycles, MTBs, and their electric variants, possibly even moreso on the latter, as the addition of electric power tends to bring even more added controls to the bike.
Having said that, I am not nor do I claim to be a professional, certified ‘bike fitter.’ Those services are available with a typical price tag in the US of $100-$250USD, and mwy be worth it for some, or those really riding at 10/10ths professionally or with professional aspirations. Myself, I take the tact of ‘better is better’ even if it’s not perfect, and it usually takes a bit of trial and error but you can get most of the way there yourself.
What are the things affecting bike ergonomics?
Perhaps surprisingly to some - quite a bit. It starts with the bike’s frame and it’s geometry (reach, stack height, seat angle and the like) and how well that matches up with your personal and very specific body geometry - even 2 people at identical height and weights may have differences - one may have longer arms and torso with shorter legs, and the other vice versa.
The good news is that unlike buying a pair of jeans, bike frames come in a limited number of sizes (typically 3-5 frame sizes), and there is enough adjustability in seat height, seat position, stems and bar dimensions to be able to fine-tune your ride to fit you properly as long as your frame size is reasonably close for you.
The addition of electric power to bikes has some claiming ‘a size down is fine’ and I think there is some truth in that, but it depends on how someone rides (e.g. casually vs professionally and all the degrees in between), and if a bike’s frame is too small for you, you’ll nearly always wind up getting a longer seat post or dropper, along with stem and or handlebars. The best thing you can do on frame sizes is go and try the bike(s) in person in different sizes. Failing that, you can try to find a different bike with similar dimensions and try those in person, or as a last resort, find people already owning that bike or frame to see which size they chose and if they are happy with the fit or not (also consider if their riding style matches yours as well; if they casually ride 5 miles on the street and you are an aggressive trail shredder going for hours, their ‘it fits fine’ may not be the right opinion to go off of...).
So the following can all have an effect on bike ergonomics:
frame size and geometry
your body-specific geometery - height, inseam, arm and torso length
your personal riding style
seatpost or dropper length and position
bar stem dimensions
handlebar width and rise
controls and control positioning
No doubt someone will want to add to the list above, and probably the next closest one I might add is crank arm length. The main reason most change crank arm length is due to bike geometry and individual riding locations/style; more specifically if users are encountering excessive pedal strikes they may choose to move to shorter crank arms. Just note that changes in crank arm length will have some effect on overall geometry, for example you may need to raise or lower the seat height at the least.
For purposes of this specific article, we’ll stick primarily to controls but will cover the others in subsequent articles.
Riding Positions
This article will focus on MTBs, or the X2 specifically, but the same general concepts apply.
There are really only a few primary positions - seated position and ‘attack’ position, with some degress of variance for both climbing and descending.
Why we care about this is simple - each position moves you on the bike, along with your hands, and you’ll want to make sure the controls are accessible in each of the positions, or you may, for example, find your brake lever ‘perfect’ when in attack position suddenly has the lever out of reach when doing a downhill section.
The seated position is just that - seated, which on eMTBs may well be used more often than on analog bikes, but regardless is used for more tame, casual riding or riding when on relatively flat ground or road. Note that for a proper seat height (or max dropper extension), you want to be seated with the front half of your feet on the pedals, one pedal fully down in the 6 o’clock position, and have a very slight bend at the knee. When seated and pedaling, if your seat is too high and your leg is perfectly straight, or over-extended, you can hurt your knees. Likewise, if your seat is too low, and your leg has a more severe bend when the pedal is fully down, you can also hurt your knees, and in both cases, your poedaling is not as efficient nor easy as it should be.
Take a look at the preceding picture - the ‘attack’ position is essentially standing up, usually(pretty much always) lowering the dropper post/seat level, heels leaned back slightly and knees slightly bent, with your weight at least initially mostly centered over the BB/center of the bike. If on flat terrain, you can fully extend your legs t stretch/take a break, but you’ll want your knees (and elbows) slightly bent to help in absorbing shock as the terrain changes beneath you.
Of course, ‘attack’ position is a starting point - you’ll move your weight around and hips forward or back, side to side depending on the terrain specifics.
Descending is just an extension of the attack position, where your center mass/hips will move forward and rearward as required.
Climbing can be done in some cases with the seat/dropper fully up, or standing, whereas weight will usually be shifted forward a bit to keep the bike stable, and most will be standing depending on the steepness of the climb.
Controls
Coming back to bike controls…assuming you’ve at least done basic seat height and handlebar adjustment, we’ll want to cycle through the various positions and ensure proper placement and reach; that is, the controls are easy to use without undue additional movement of your hands, operate properly, and to ensure you can literally operate the controls with your eyes closed across all positions.
The X2 out of the box, at least for me, was pretty wonky out of the box. The dropper lever was positioned way high, needing extreme hand movement to engage it properly, the SRAM G2 brake levers are 2 finger levers, but were positioned way outboard and angled ‘wrong,' the power control on the left hand side was positioned far inwards, and in short - they weren’t suited to me, at all.
The good news is controls can nearly always be improved - often using what you have
All of the controls can be removed from the bars, or loosened enough to do so, with a Torx bit, Phillips screwdriver and 2-5mm allen keys.
Before starting, think about your hand positioning. You can sit on the bike in the attack position leaning the rear wheel against a tree in a secure position, or secure the bike and come as close as you can. Touch each of the controls, going through the motions of using them, and note when/where you are repositioning your hands or moving them the most - those are prime candidates for reworking the layout on.
Also consider if planning to add any additional controls, e.g. dropper level, bell, etc.
For me, years of dual-sport and off-road motorcycle riding got me pretty comfortable in the posted or ‘attack’ position, as well as in using 1 or 2 fingers on the brakes, so immediately I knew I could at the least reposition the brakes inwards.
Meanwhile, I wanted the power controls (bike control pad + throttle) on the left, to not be trying to both adjust assistance levels and shifting with the same hand. The funky shape of both the DP C240 control pad (the dongle sticking out for the main power button) as well as the inordinately wide OEM throttle paddle did me no favors here as they wanted to conflict with each other positioninally, especially when I rotated the control pad to be more natural so I didn’t need to re-position my left hand much to power up or down in the modes.
Eventually I wound up dremeling and filing the throttle ‘wings’ to be narrower, so my left thumb could access both the control pad and the throttle without much repositioning of my left hand. I tried a few replacement throttles as well, before coming across a vertical thumb throttle from Poland (friend of mine found it), which was truly narrow and didn’t feel bad.
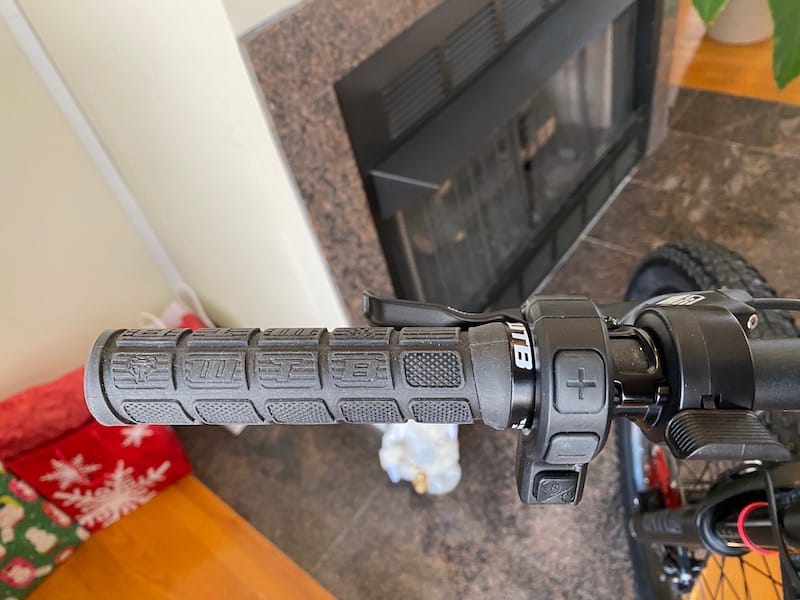
Left side - ideal would be brakes and throttle swapped
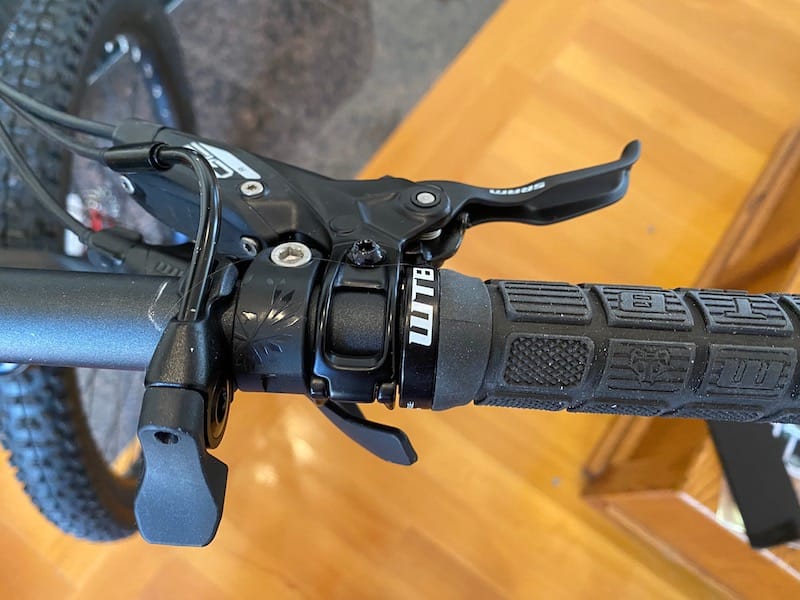
Right - brakes need to move inward still
You can see above my brake levers are adjusted downward from parallel with the ground, maybe at a 60* or so angle. I moved them further downwards as I stood on the bike in attack position and cycled through other positions, but not so far that they weren’t readily accessible when I was leaning full rearward on the bike. They’re still not ideal - different positions in/out from left to right, but at least the control pad (left pic) is now correctly poisitioned so I can power up(+) or down(-) with my left thumb without changing my hand position on the grip.
The throttle is still an awkward reach on the left and is too far inwards still. I don’t use the throttle much, but again - the goal is can operate blindfolded from all positions naturally. It’s rotated higher up than I’d like - a combination of the throw length of the throttle but mostly I needed to make sure I wouldn’t bump the power button on the control pad when riding. It can’t be moved outboard/swapped with the brake clamp due to the wideness of the throttle lever ‘wing.'
Trimming the throttle can open up more options
The left hand throttle position along with the brakes being so far outwards really annoyed me, so while waiting for other throttles to arrive, I took a dremel to cut off the ends of the throttle, making it so the throttle lever width was slightly narrower than the housing/bar clamp, letting me position it right up against the control pad and moving the brakes inward where they below - for proper 1/2 finger brake lever positioning.
There was still some minor compromise needed here, balancing between start and end of the throttle ‘throw’ (normal poisition vs fully depressed/full throttle position) and the control pad, but this was much, much better.
Trimming the throttle wings with dremel and file to narrow it
What about the right hand side?
I really wasn’t happy there with the brake lever clamp being fully outboard, and meanwhile I already had decided I needed to add a bike bell, as a jogger pulling a U-turn just as I was about to pass them on a greenway trail led to a rather intense ‘stoppie’(rear wheel off ground while braking hard), so had yet more controls to sort out. I did swap the brake clamp and the shifter positions for a bit, but it still wasn’t ideal for me.
Enter SRAM MatchMaker (MMX), Shimano I-Spec, ...
Let me preface this with - the control layout could still be improved further, and the new throttle made things much better. However, wit hthe right brake lever positioned properly for 1-2 finger operation, the shifter wasn’t entirely ideal.
SRAM and Shimano both make their own variants of an ‘integrated control system,’ which is really a fancy way of saying - single bar clamp connecting multiple controls…for example, the brake lever and shifter can attach to a single bar clamp, or a brake lever and dropper remote, assuming each control is compatible. Mostly the ’special’ part revolves around the clamp itself, having the option to bolt the other compatible controls to it. They also provide some additional adjustability, allowing at minimum the ability to position the attached control up or down a bit, and some also allow some level of side to side adjustment as well.
On the X2, at least those equipped with SRAM G2 brakes (vs the Hayes Dominions), the brake clamps themselves are the same as if you buy a new set of MMX clamps - however, they don’t have the additional angled piece and nut/screw needed to directly attach an MMX-compatible control. I’m unsure if you can buy those separately, so I wound up buying a pair of MMX bar clamps including all pieces for ~$30 or so.
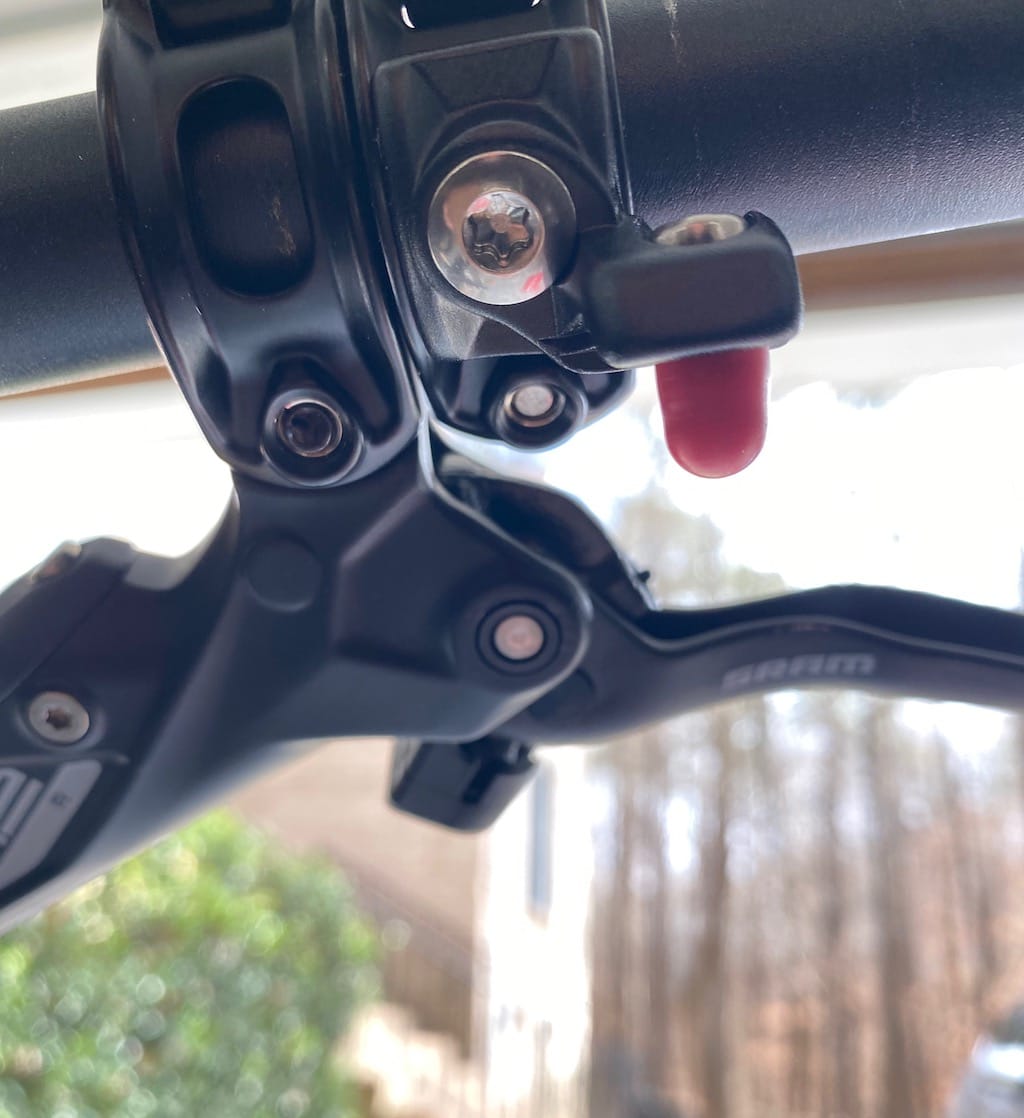
Note that Shimano seems to have numerous variants of their i-Spec, so if you go down this road, make sure all parts are the same spec and compatible! For SRAM - it’s easier, at least at this point in time. You can see in the pic the comparison of the standard bar clamp on the left vs the MMX variant on the right, with the 90* ‘wing’ added on with a pair of screws (screw end covered by red cap where the control bolts on to, while the other screw lets you adjust up/downwards).
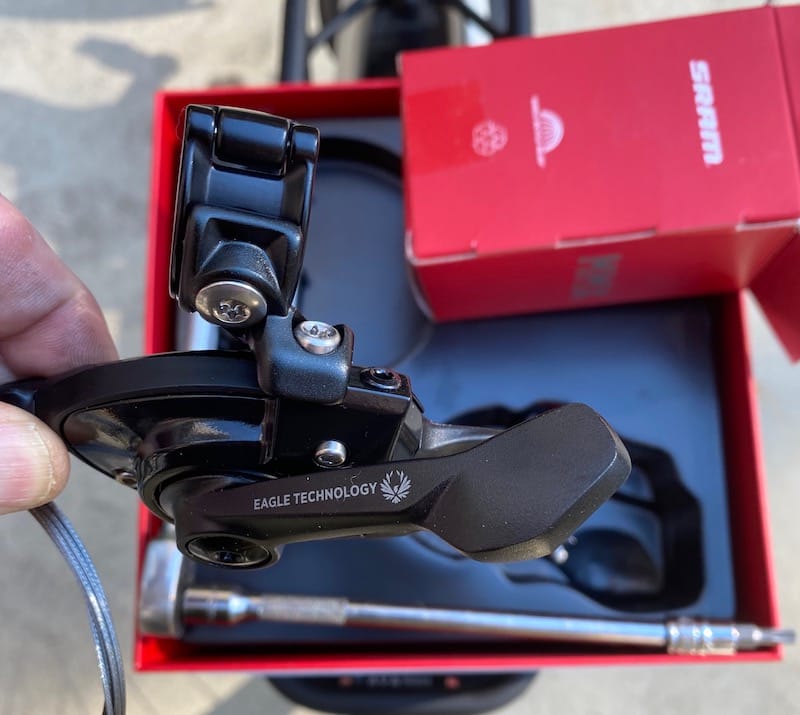
Meanwhile, the NX shifter that came with the X2 was the e-bike variant, but they don’t currently make NX-series MMX-compatible variants, and unfrotunately at least on the shifters, there are no simple adapters to take a bar-clamp-mount shifter to simply convert it to MMX-compatible.
On the positive side, the SRAM GX shifter can be had in an MMX-compatible variant, is a bit beefier than the NX version, with more metal components, and is nearly the same price, so for $42 or so, it was a price I was willing to pay.
The GX shifter install is pretty easy - Loosen the shift cable at the reare derailleur, pull the cable out of the NX shifter, unbolt the NX shifter and remove.
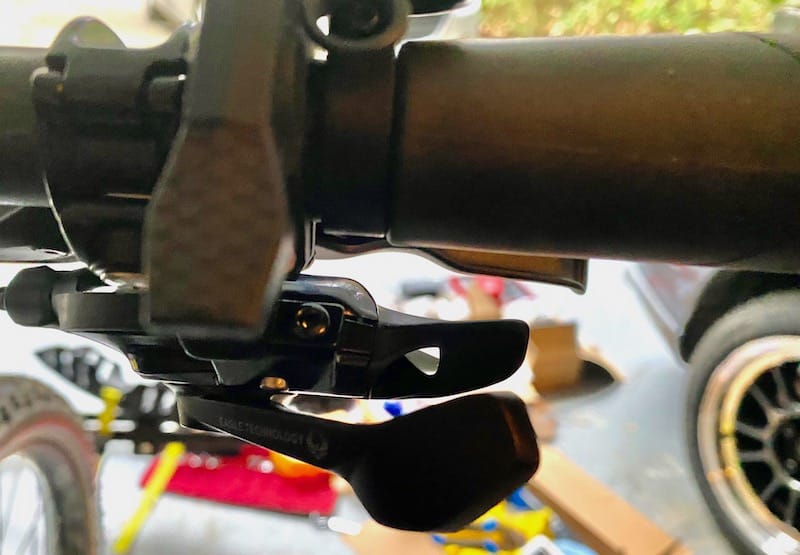
The MMX shifter uses the single screw showing on the bare MMX clamp image to attach, and then once mounted allows some u/down adjustment. I don’t immediately recall if it also allowed any in/out adjustment, but the end result came out reasonably well, also allowing me to add the bell on the right, and also once the ‘skinny’ throttle arrived, moving that to the right side as well. You can see both in the following pictures..
SRAM standard G2 bar clamp vs MMX on right
SRAM GX Shifter installed onto MMX bar clamp
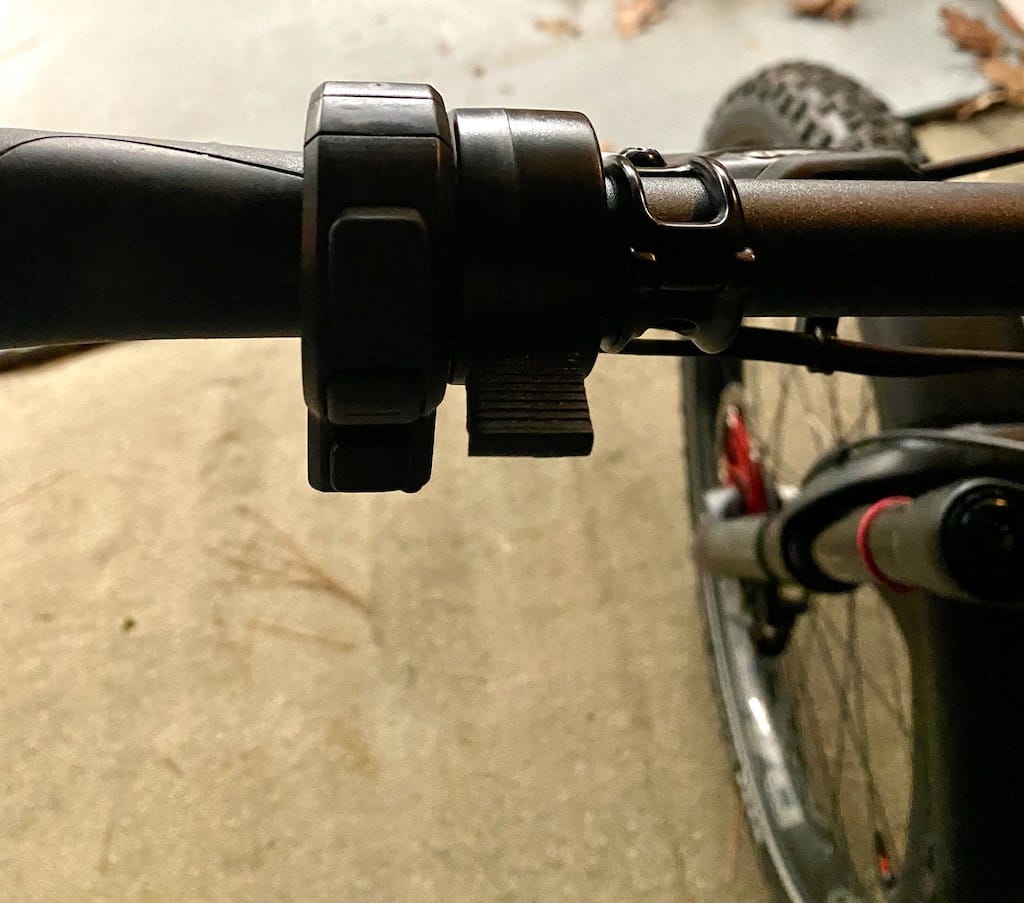
Final touches
You can see to the right the aforementioned throttle as well as the bottom of the bell, and the GX shifter mounted to the MMX clamp. This was overall somewhat tight (the bell can’t touch anything or it’ll be silenced/not ‘ding’), but pretty close to ideal.
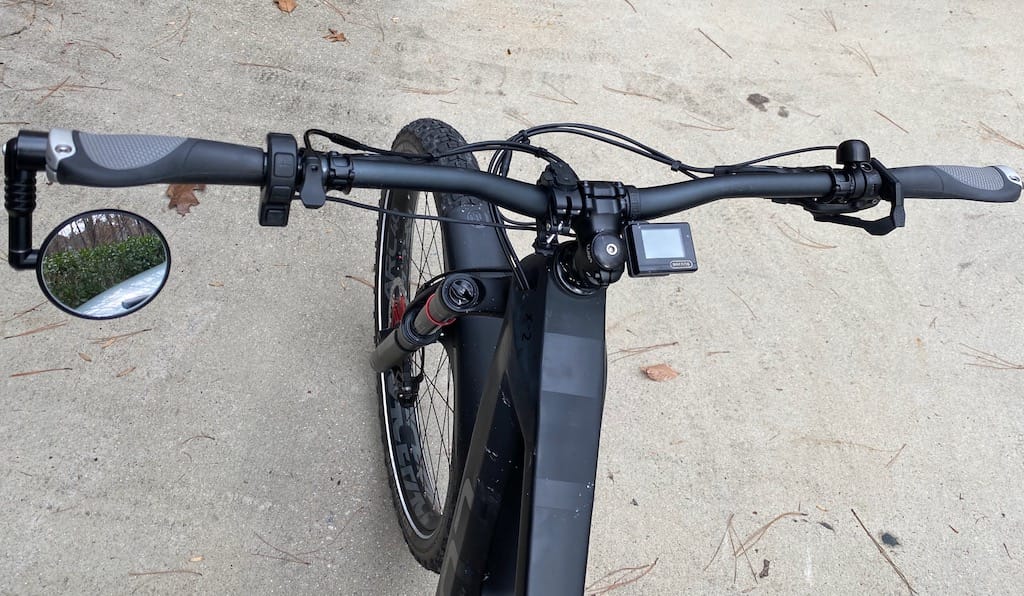
You can see an intermediate/in-work pic of the full bars/controls to the right, which included swapping out the WTB grips for some Ergon GA1, along with adding a bar-end Mirracycle single mirror (can be set for above or below the bars - I prefer below the bars in case of a wipeout, as it’s more likely for hands to slip/slide over the bars than below, so less to smack into, although above the bars probably gives a bit of a better view - I’m mostly on trails, so it’s more for occasional use to make sure I can see my wife’s headlight on somewhere behind me..)
I had also moved the original KS dropper lever over to the left hand side, but already knew I was going to replace the too-short 125mm KS dropper with an SDG Tells 175mm dropper.
That dropper originally (bought it used) came with a RaceFace vertical dropper remote, which in a nutshell - was just garbage; lack of a clamping washer, soft screw and metal, so I immediately went looking for a replacement, and decided while it might not work out, I wanted to try going with a horizontal dropper remote, so might as well go for an MMX-compatible version.
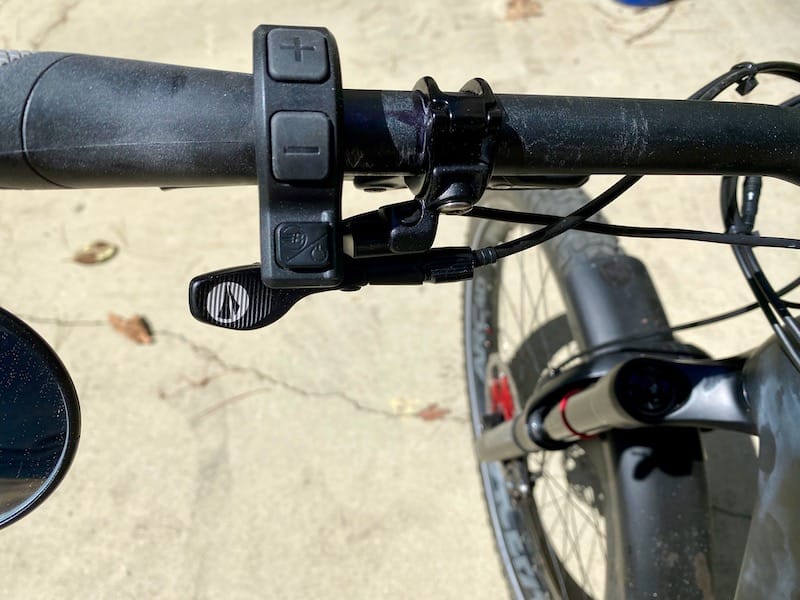
The Wolf LA and OneUp were in final contention, but then I saw the SDG one for $50 which also had in/out adjustability. Considering the placement of the control pad on the left, I went with the SDG remote and lucked out; it has much more solid engagement on the dropper cable, and with a bit of finessing, fits pretty well (if barely) along with the ‘dongle’ part of the DP C240 display so I’m not stretching or re-positioning to use it. The pic may seem to be at an odd angle, but installing it with both screws loose, then mounting the bike, let me do final adjustments and overall it’s quite good so far.
One thing worth noting is how far inboard the MMX clamp actually sits from the grip - it’s adjusted for a ‘finger and a half’ type position, meaning it could go slightly more inboard if I wanted, I use one finger for braking, but could still use two if I wanted to. If someone wanted to move the brake lever/clamp outboard more, I could, while still compensating at least partially by sliding the dropper remote further inboard on the MMX mount.
GX shifter installed on MMX mount
Controls layout - almost done
SDG Tellis dropper remote installed on MMX clamp
So, done now?
Actually - pretty much. I’d really like to find a replacement for the DP C240 control pad, something without the 'hanging dongle,’ and will do a minor round of cable shortening and cleanup, but yeah - I’m pretty happy with the layout at this point. At least for now.. ;)