3D Printing a HomeLab Server Rack
Racks aren’t just for datacenters anymore…
Home mini-racks can be used for lots of purposes - not just mini-servers, but also to hold things like your router, switch, Hue hubs and more.
Homelab? Why would I want a rack?
Well - it depends. I’ve had both full and half-height server racks at home at times in the past, as well as built and managed a few datacenters. For me - it was about compute and storage, and was running numerous servers and services at home, with UPS, multiple servers full of VMs, and SAN storage. My power bill didn’t love me.
‘Homelab’ is a generic definition for those running servers at home, usually but not always with some external connectivity to use those services form when you’re traveling, but sometimes just to do things like handle backups, run home automations, music servers and the like.
The whole popularity and setups have evolved over time - the explision of NUCs and mini-computers, the continual growth of open source software, and it’s possible today to run a pretty large amount of software of some seriously tiny, and often power-efficient systems.
Of course, you can also use a rack for anything from a bookcase, or simply to hold your router and modem - or get much more complicated.
I’ve got a handful of Lenovo Tiny systems, along with some N100 and lower power i5-based NUC or NUC-like systems. Dell Optiplex minis and HP Elite Minis cloned the Lenovo Tiny form factor and are also popular, although I prefer the Lenovos personally as most of them have a PCI/PCIE riser that I use on most of them. These are all great candidates to slot into a mini-rack.
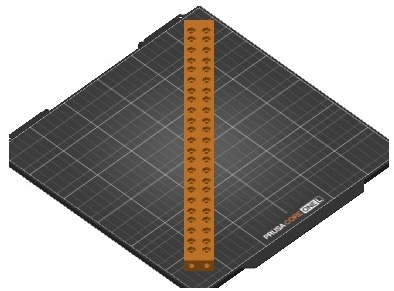
Standard data center racks are 19” wide, and typically 42-48 ‘rack units’ or ‘U’ in height. and up to 42” deep. A single ‘rack unit’ or 1U is ~1.75inches(!44.45mm), and can hold the shortest servers.
This also means a 42U rack server is right around 6ft(~1800mm) tall, and is pretty crazy for home use, although not unheard of(I’ve done it :) ).
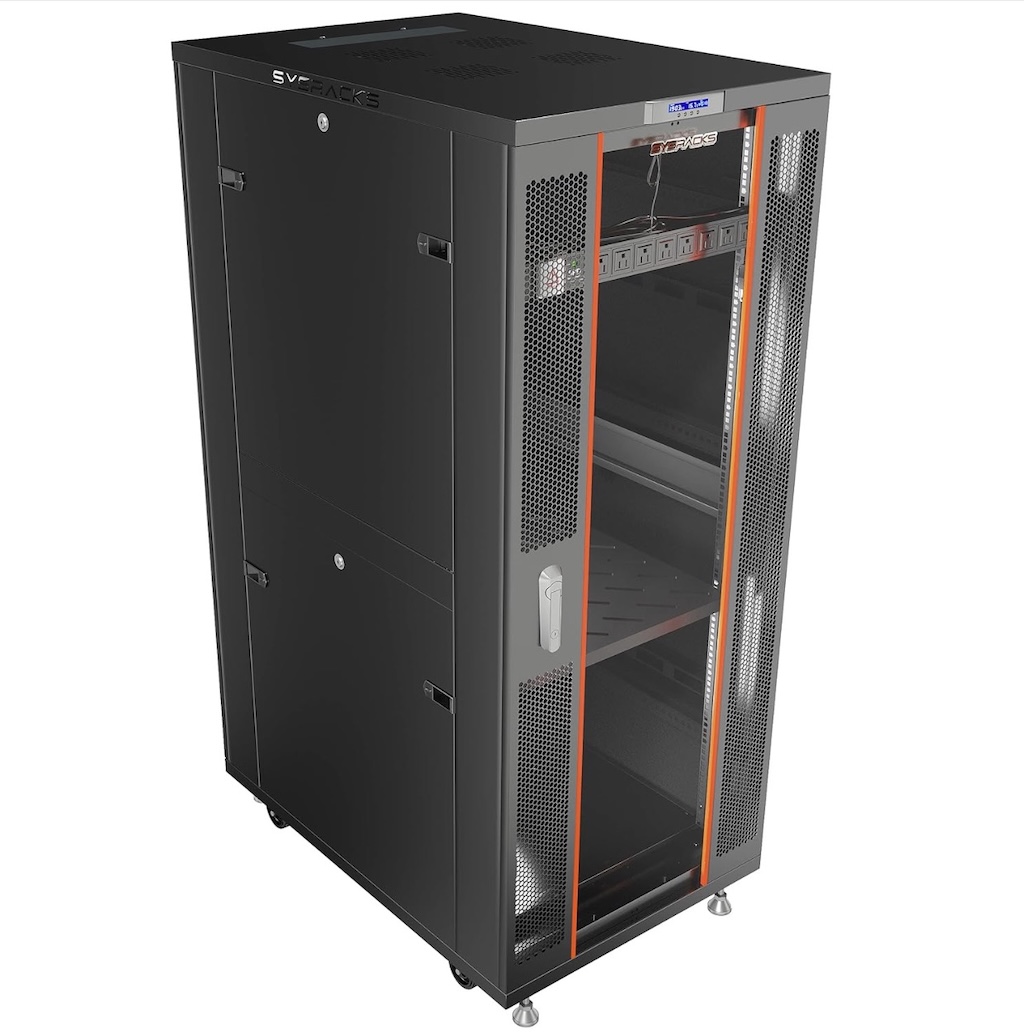
A full height 42U server rack isn’t the ideal for most home users, and usually run over $1000USD new - before adding server mounts, rails, PDUs and patch panels.
There are better options for the home
Even though there are half-height and now even quarter-height server racks also available, they’re still pretty big, and set up for 19” width servers. If you know you really need a full-wdith rack, you’re probably not reading this - although there are some 19” rack accessories that are still printable.
Meanwhile, for most home uses, including some pretty advanced ones, thankfully another standard of sorts has developed -
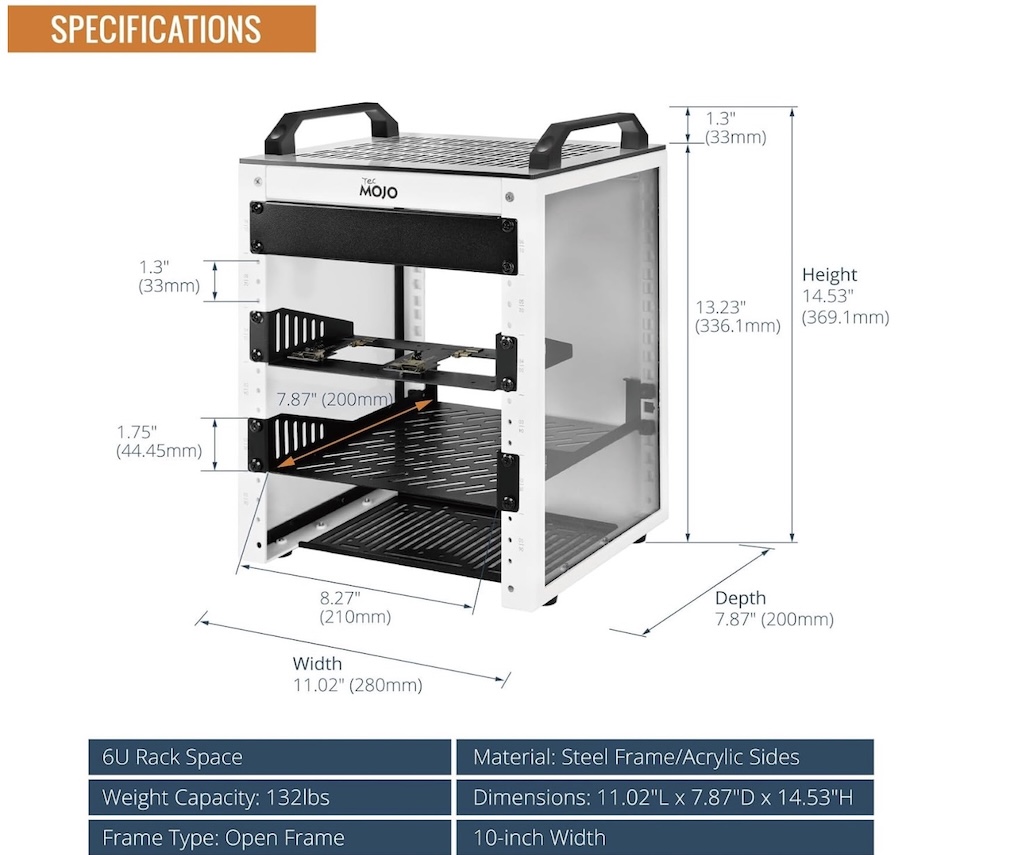
The 10” mini-rack
The 10” here refers to the width, with various options in height ranging from 4U on up. Depth is uslaly 200-250mm or so.
You can buy them pre-built, for example in a 6U or 12U configuration, and they’re not terribly priced overall in the $60-$150 range USD.
Even if you decide to buy one, I’d still check the depth on them. For example, most Lenovo Tiny models and the Dell and HP ‘clones’ are roughly 8” squares, so if you buy a rack that’s 7” deep, you’ll have a bit poking out the back. This isn’t really a problem other than visually or if you intend to also mount things on the back of the rack like cable guides, patch panels, etc., but wanted to call this out. Even if you decide to buy a pre-fabricated rack, chances are high you’ll still need some additional inserts for your equipment.
The good news is - we can 3D print the entire rack or just the accessories!
A pre-fabricated metal 6U 10” mini rack can be had for around $80 USD or so.
Let’s get started - with a plan
Unlike some projects where it’s ‘print all the parts and you’re done,’ printing your own rack will take a bit of planning up front, and a fair number of miscellaneous parts.
First - what do you want to put in it?
This one is perhaps the most important starting point, as we need to sort how high the rack needs to be, in rack units. Some quipment is easier than others - a Lenovo Tiny, HP Elite Mini, Dell Optiplex Mini, and standard height NUCs, Raspberry Pi 4/5 and similar embedded boards like the Nvidea Orin Nano, and nearly all home/office up to 8port network switches - each will consume 1U of height.
There are a few ‘tricks’ we may be able to do, for example if you have multiple Raspberry Pis, there are ways to get multiple Pis stacking vertically (depending on your Pi model), or at least 2 of them in a 1U space. In the worse case, add up the number of devices shorter than 1.75” and assign 1U to those, and any > 1.75” but < 3.5” assign 2U and add it all up. You may also want to consider a 1U space for a keystone or patch panel to clean up wiring.
Rotating the rail may let you be able to go taller/more rack units depending on your printer - but you may need to do 1 or 2 at a time..
Also - consider your print bed/sheet size!
Once you determine your minimum rack units, you’ll also want to consider if you plan to add more devices. In some cases, your print bed size may limit you to a specific maximum height. Depending on your printer model, you may be able to rotate the vertical rails diagonally to be able to print 1-2 at a time that are taller.
Some rack models may also allow for vertical extensions to go taller than you can print at once due to bed dimensions
I personally went with this one, which allows for different height combinations, also allows for 6” width racks (wouldn’t work for me with my Lenovo Tinys), and single or doubled-up vertical rails. I did 7U but had to print the verticals on my Core One L diagonally one at a time. This specific rack has a bit of ‘extra’ vertical space, so I should be able to get my 3 Tinys, 3 NUCs, network switch, keystone panel for network cabling, and a few other embedded-type boards in it if I plan it out carefully.
It does, however, not have sides or a top ready-made for it. Doing it again, I might consider building a Lab Rax, although it’s default configuration is only 5U (but does offer an extension kit design, with side and top panels). In the worst case, as long as you have the space for it, you can always do more than one rack.
What will it cost to print?
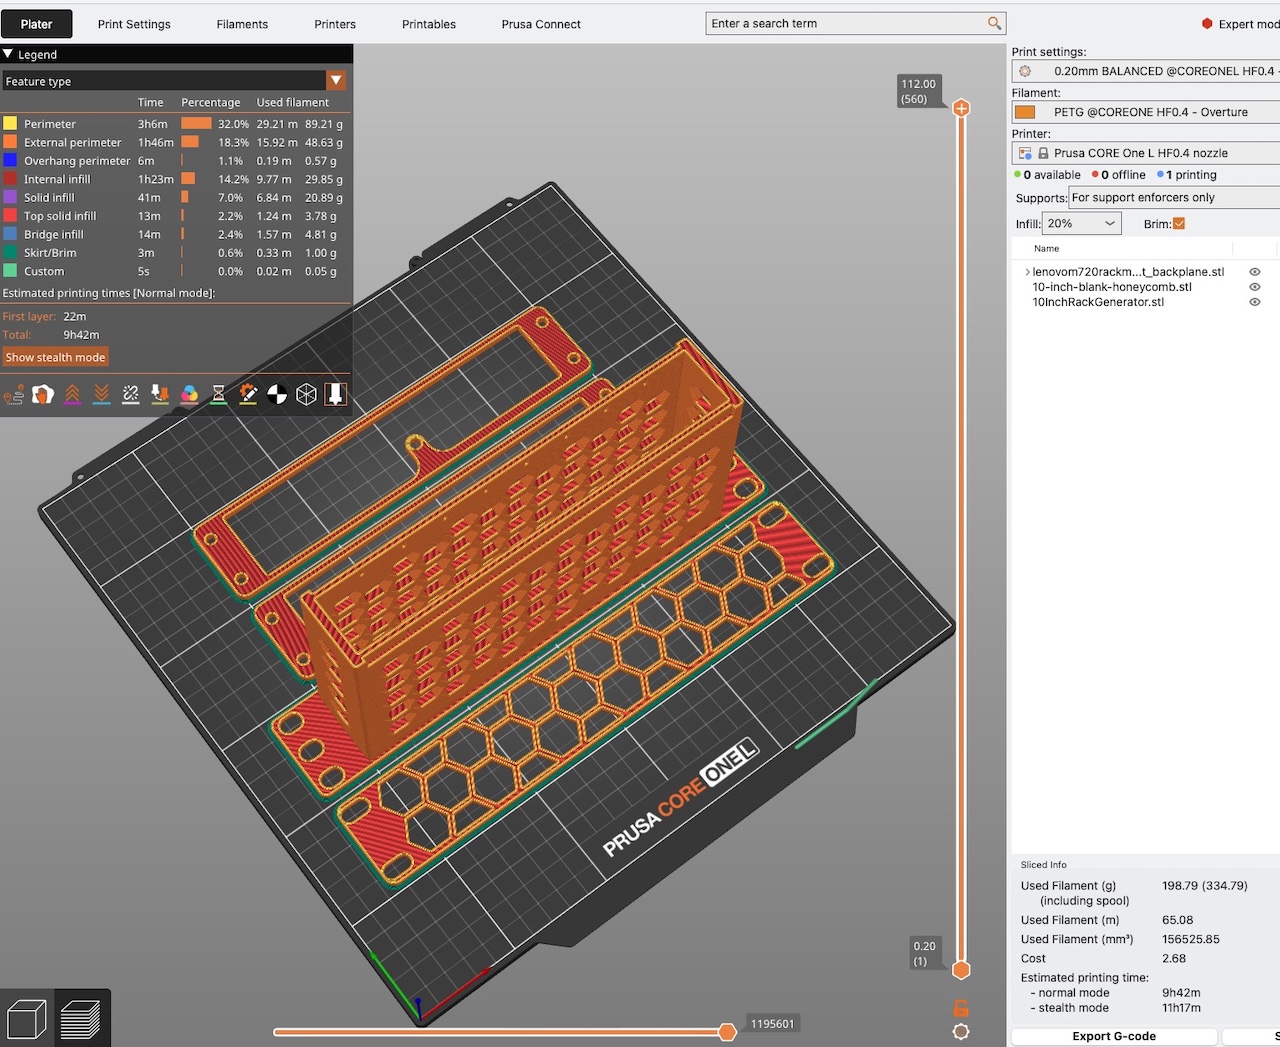
Well, it depends - single or double-width rails, with printed top and sides, number of rack units, etc. For a rough comparison, it took me around a spool of PETG(~$14USD per spool of Overture in a 2 pack) and maybe another $10 or so in various screws, nuts, etc. This compares to the $80 or so pre-fab racks. In either case, I needed to still print out various rack inserts, which you’d most likely need to do for a pre-fab purchase as well. My three Lenovo Tiny mounts took around 1 spool (also PETG), which very likely could have been reduced if I found a better model and I wasn’t erring on the side of ‘don’t want to print these again’ so multiple perimeters, 25% infill, etc. settings. The rest of the inserts used less than a spool, plus some additional screws, heat inserts, and nuts.
Let’s finish the plan - material list
You’ll have to do some deciding on which rack and U height you’ll be doing, and then pay attention to both non-printed materials (screws, nuts, heat inserts, ..) as well as plan which rack inserts you’ll be doing for your rack and equipment. Here’s a list I used:
-
FIlament for base rack + inserts - 2 spools out of Overture 4 pack black PETG - under $11/spool in the 4 pack
-
50 pack of M5 heat set thread inserts - you can find cheaper ones but these are good.
-
More M5 screws to use for all the insert mounts - ~$9
-
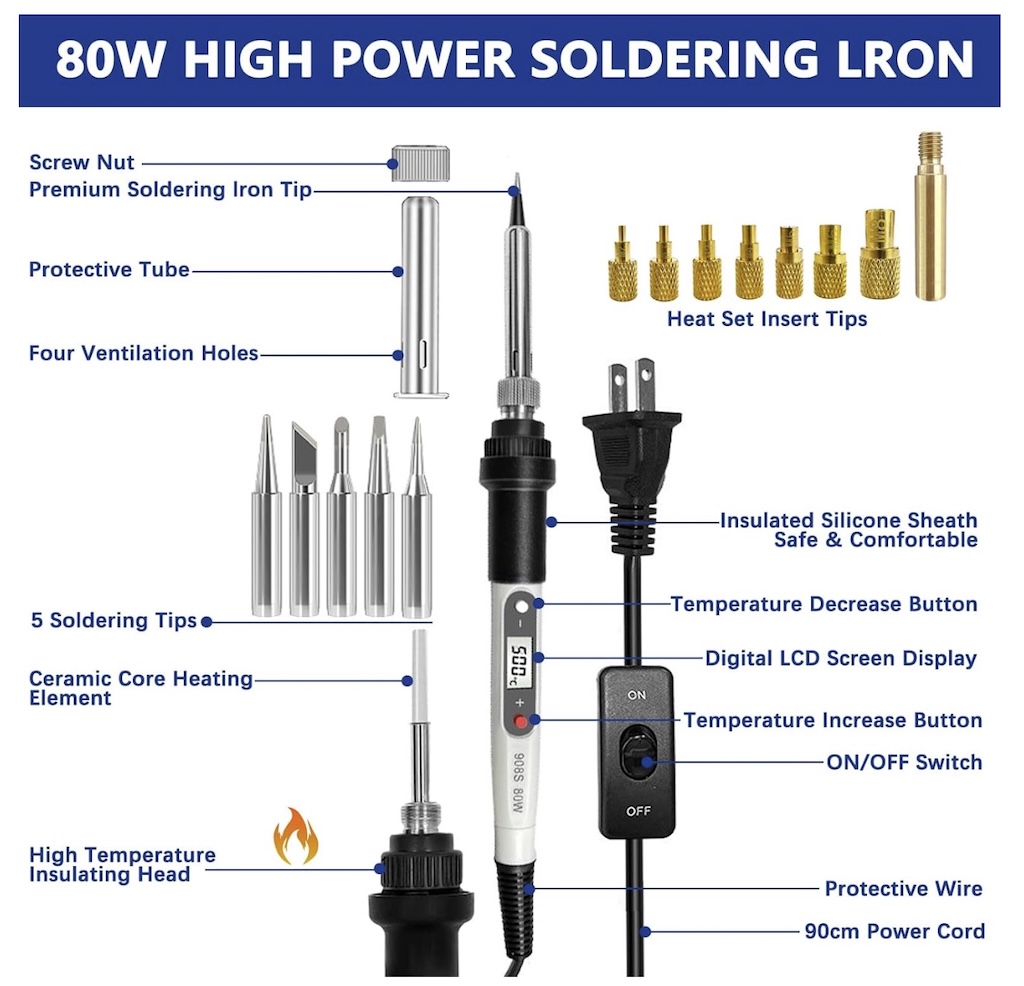
Soldering iron with heat-set insert adapters if needed - ~$20
-
10-pack of .5 foot cat6 patch cables - ~$7, to run from patch panel to switch ports
-
10-pack of 2’ cat6 to run from devices into patch panel - ~$11
-
Keystone ethernet couplers - to connect device cabling to patch panel backside- ~$11
It adds up, and you don’t really need to do the extra cabling and keystone couplers. How many screws you’ll need and the size/lengths depend on the rack choice, but also note that for any accessories and inserts, you’ll generally want to have 4 screws (and nuts of heat-set inserts) per 1U to screw them in. You may also need various screws to for example, screw ears or an adapter to your network switch.
In the event you do wind up over-buying on metric screws or inserts - trust me, it’s ok - you will undoubtedly find uses for them in your next prints, or even just random bits at home. Also, you may be tempted to get ‘cat 6a’ cables and keystone connectors - it’s really not worth it, as cat6 will do 10Gbit/second up to 50 or so meters or further - 6a just extends that length, which really is only needed for long cable runs longer than almost all of our houses.
A few notes on printing the rack parts
If you haven’t picked up on it, I’d consider the minimum material here to be PETG. PLA has a high chance of seeing some heat-induced deformity over time, and PETG ‘should be resistant enough.’ Of course, if you want to go higher in the temperature resistance range, you can go with ASA, but do not use any CF/carbon fiber reinforced material as the carbon portion is actually electrically conductive.
Color choices, however - are entirely up to you. ;)
A note on print settings
Before doing prints like these where you will most likely go through a spool of filament or two, make sure your printer is in good shape, and you’re sure you’re reasonably calibrated for the filament material you’re going to be printing. If in doubt, at least do a temperature tower and/or other calibrations beforehand, and add brims if you’ve had any adhesion issues.
For nearly all of the rack and adapter parts, I run in ‘balanced’ mode speed-wise, with 4-6 perimeters, 4-6 layers for bottom and top layers, 25% infill (gyroid), and with a 4mm brim on any parts I have doubts on. This means slower printing, but hopefully zero failed prints. It also uses a bit more filament, but gives me confidence I won’t be re-doing these parts unexpectedly. YMMV.
Rack mounts
You should have sorted these out during planning, but if not, we can now.
A typical rack, including datacenter racks, more or less follows the following:
-
Network switch(es) up top
-
Patch panel(s) up top just below the switch or in the middle depending on wiring details.
-
UPS or heaviest systems on the bottom
-
If you have systems you know run hot, especially if they vent upwards instead of out the back, consider leaving some air gap/space above them unused.
-
Power strips/smart PDUs generally are in the back of the rack
You can choose to ignore the above, and there will be challenges to find a decent true rack-mount PDU/power strip, but I’ll start out with something like this:
-
Patch panel at the very top, mainly as it’s an extra ‘half unit’ I can get a single screw in - and that will be enough. Will use a keystone panel for this.
-
Switch directly below the patch panel, and use 6 inch cat6 cables to connect from the panel to the switch.
-
Lenovo Tinys as the heaviest systems on the bottom.
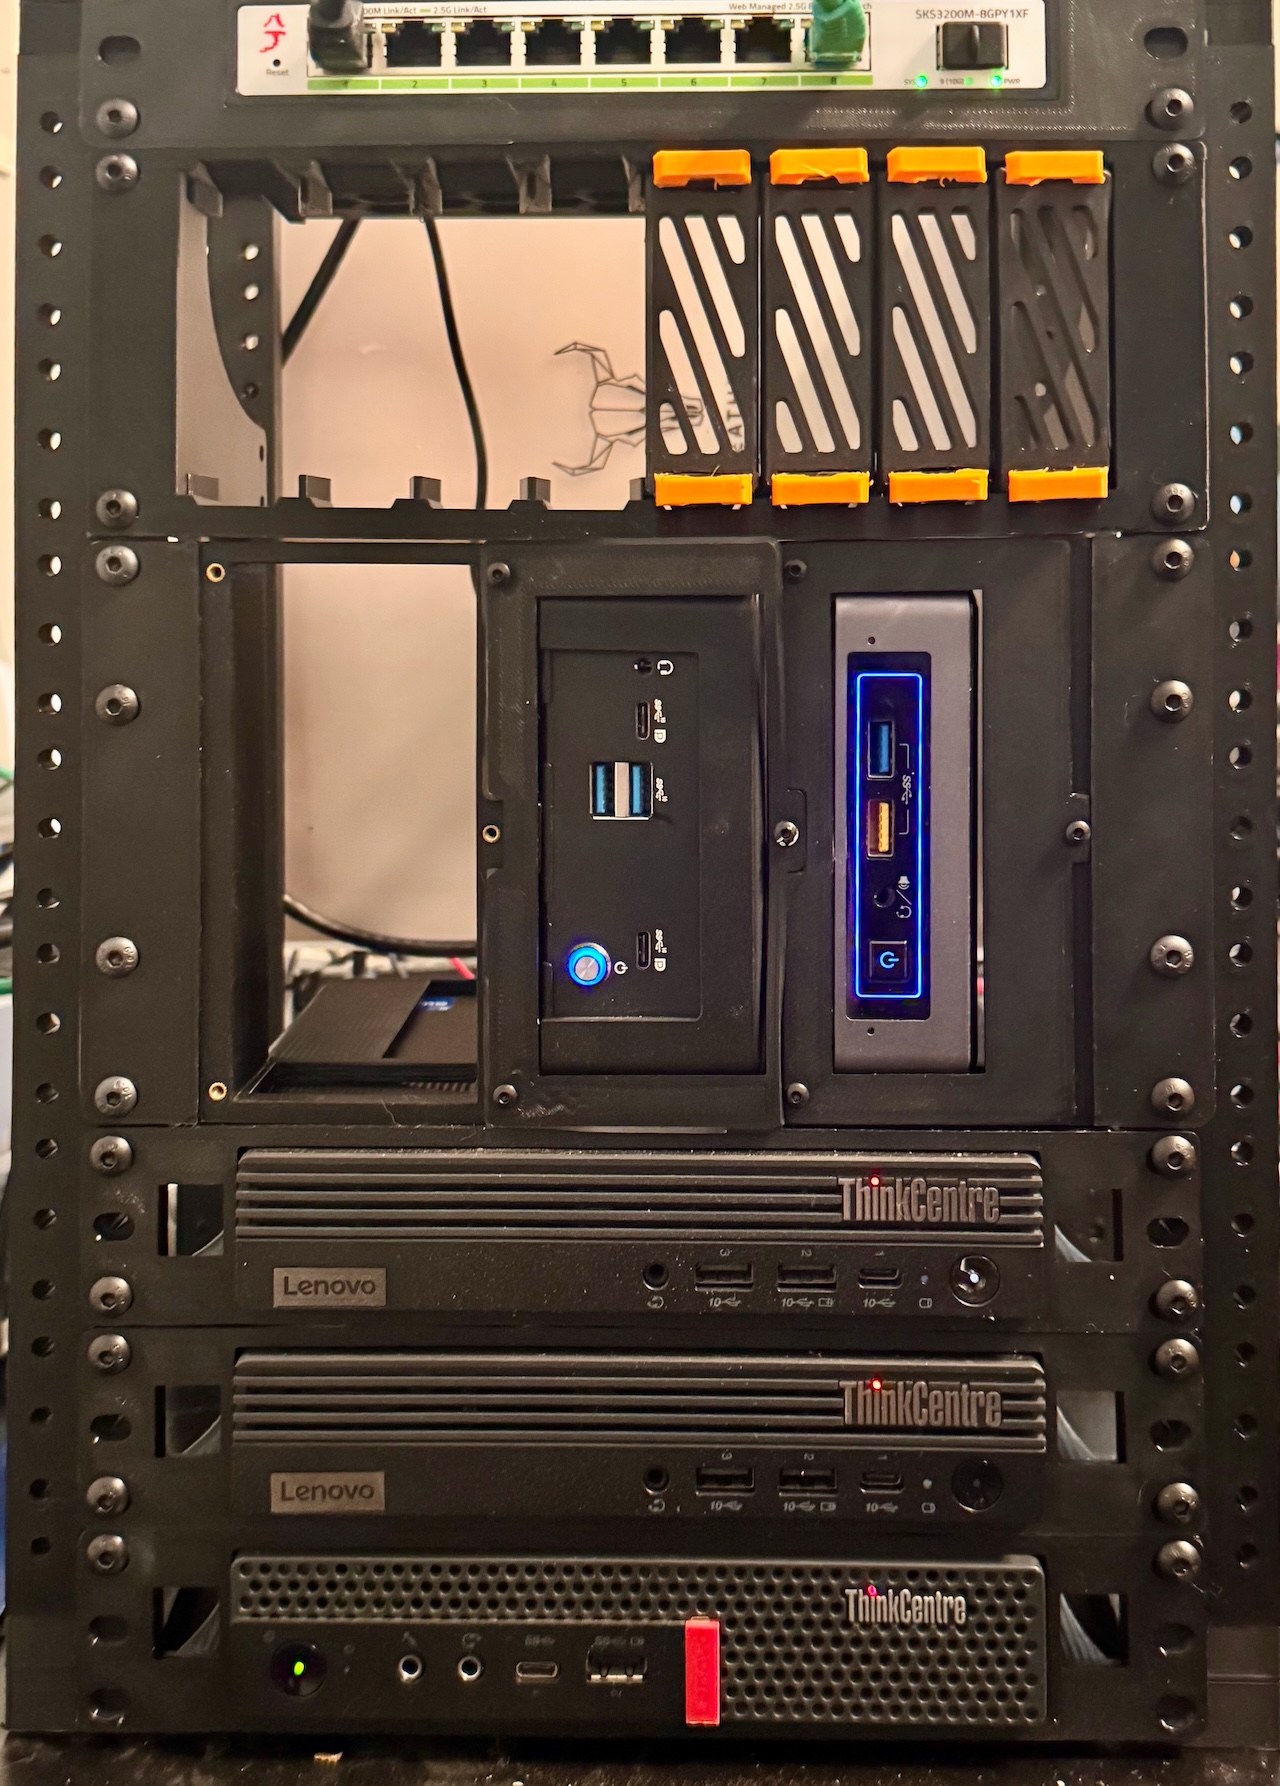
You can see to the right the start of the rack going together - a keystone patch panel at the very top, technically not using part of the 7U (on these rails, 3 holes = 1U), with a mounted Lenovo Tiny at the bottom. I’ve also got a single hole and some space at the bottom, so I can sort of squeeze an extra 1U at top (keystone panel) and 1 more at the bottom if I need to. Your choice of rack may be more precise, and don’t put heavy items on ‘partial’ screwed in mounts.
Even on heavier systems, if they are only 1U, you don’t need all 6 screws, but you should use at least 4 - 2 per side, like shown for the Tiny system.
One other thing to be aware of. Datacenter servers are designed specifically to go into datacenter racks, and as such, their cooling and ventilation is designed to push air out of the back of the system. Some systems DO run hotter than others, but in general designed-for enterprise/datacenter-use systems do not have top vents and all push air from front to back. This is not necessarily the case with the TinyPCs (and HP/Dell equivalents), mini PCs, dev boards and Pis, and even the original Intel NUCs - some of them may vent out of the backside, but others may also have side or top vents. For example, while the older Tiny shown in the bottom of the rack doesn’t have any top vents, the other two newer ones do. One of the two of them I use as a mini-NAS full of M2 Nvme drives, and will be placing that one next up the stack so it doesn’t have additional heat blowing on it from the 3rd Tiny system. In most cases, this isn’t a big concern, but better to consider it as you put your rack together from an ordering perspective. While it’s ‘cool’ to add fans, LEDs and the like, they shouldn’t be required for a majority of equipment, and sometimes, adding fans can even have a negative effect on overall system cooling.
A quick note on using the ‘extra’ rack space
As you’ll see, I wound up needing to use both the upper ‘half U mount space’ as shown in the prior pic, and also will need to use the bottom space as well to give myself a total of 5U between the switch and top of the 3 Tinys.
Using the top keystone mount with a single mount isn’t a real issue, as it’s lightweight overall even when the patch panel keystone couplers are added. In the case of the Tiny, well - it’s not so light, and a majority of mini-rack/10” rackmounts don’t run full depth and connect to the rear verticals like normal full-sized datacenter racks do. This is generally OK with proper mounts, and using at least 2 screws per side of a 1U mount, like in the prior picture. However, on repositioning the Tiny all the way down, I really should drill a shallow hole for a heat-set insert to add another screw hole. Just be mindful of weight and leverage overall.

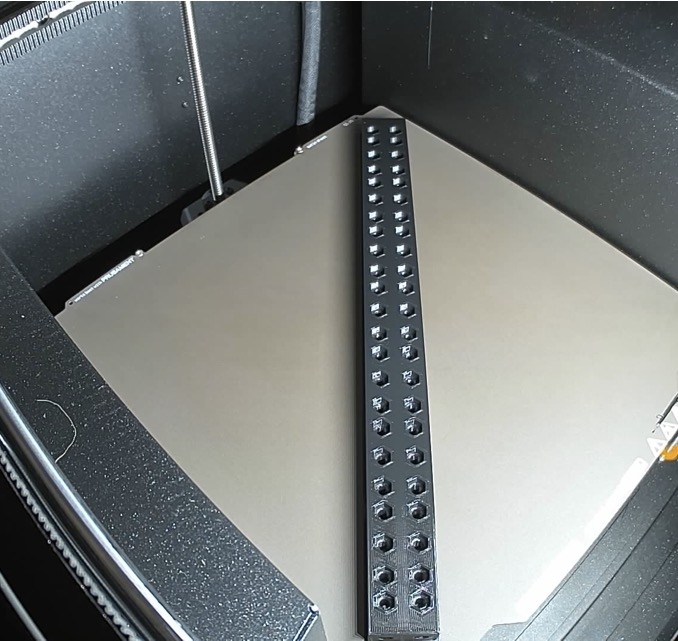
Printing a mount for the Lenovo Tiny - slowly, 25% infill.
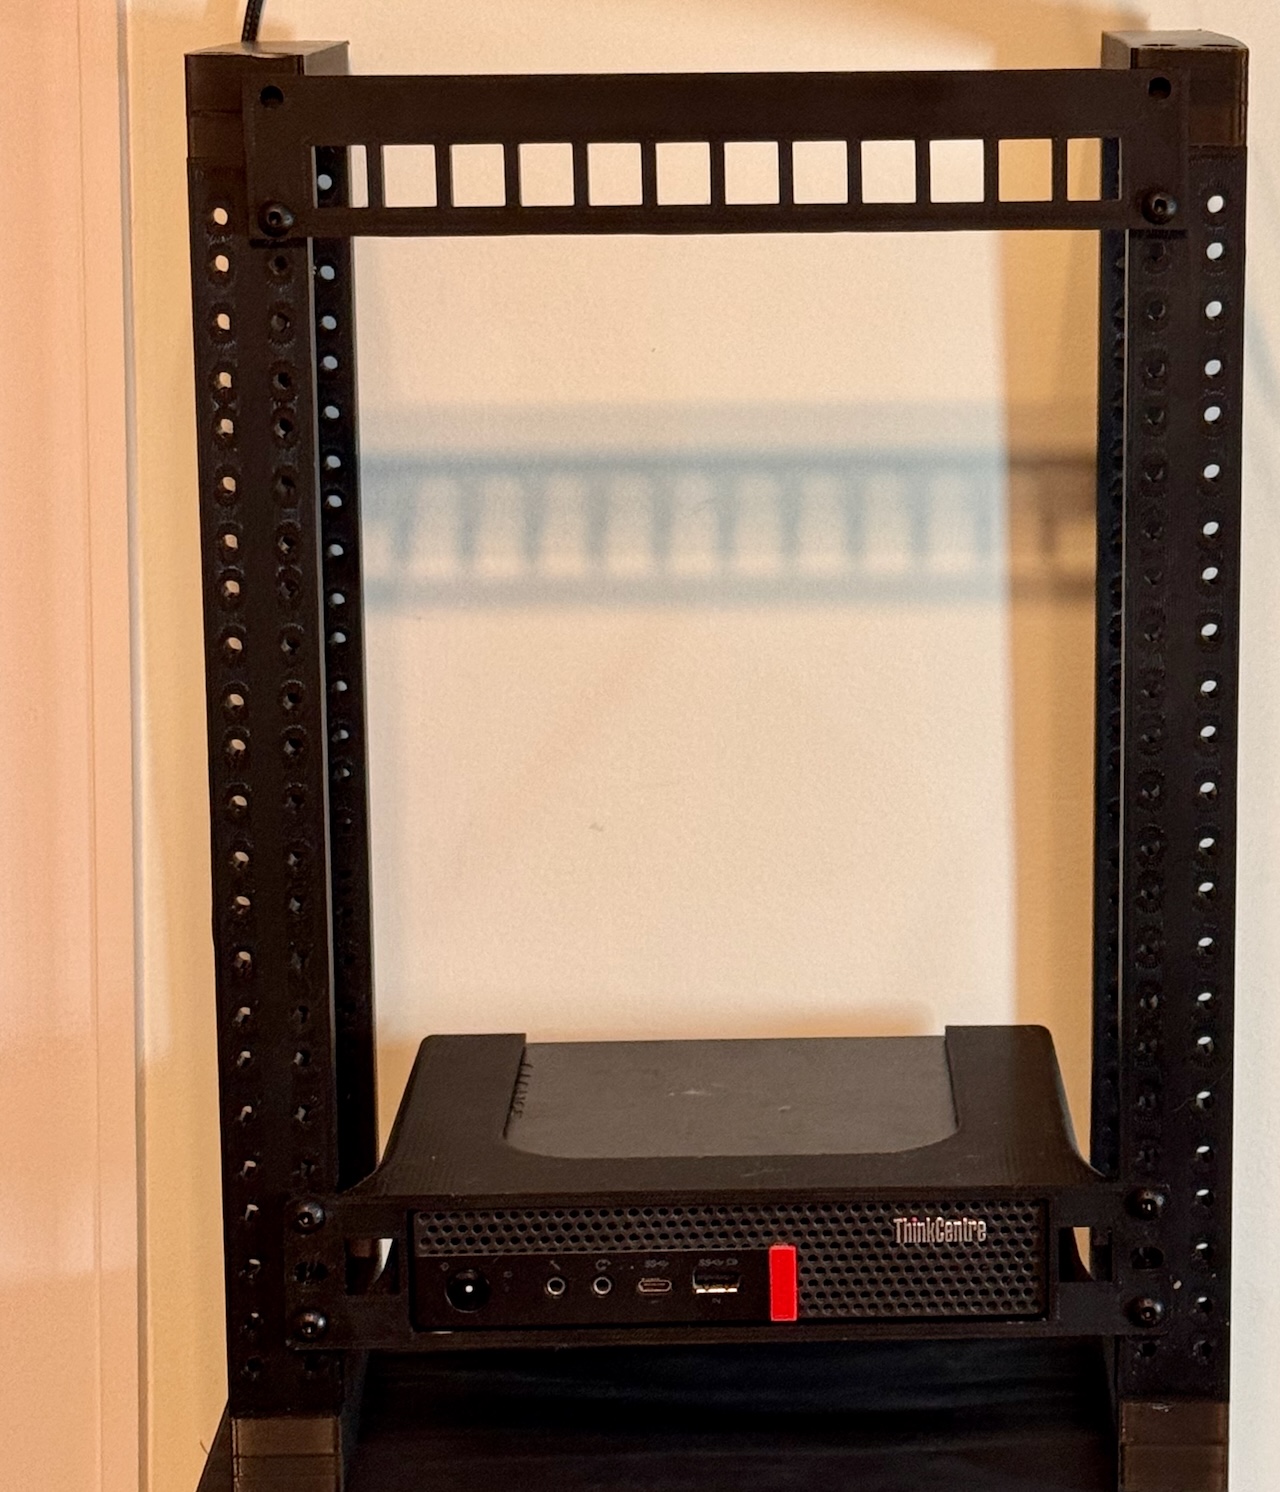
Rack starting to come together - keystone patch panel up top, and 1 of several Lenovo Tinys at the bottom. Don’t worry if your rack only has a single width rail - I chose a double width option as I may wind up building sides for it and will need to use the ‘extra’ holes in that case.
Getting ready to print 2 Lenovo Tiny backplates, a rack blank, and a mount for my 8 port switch
Populating the Rack and Finishing Up
So I’ll manage, barely, to get 9U of usable space out of my 7U rack as follows from top to bottom:
-
Keystone patch panel on the upper single hole per side/topmost point. This will mostly be used for ethernet couplers, along with 6” cables to the swith directly below.
-
8 port 2.5Gb switch - realistically, I’m going to run out of ports, but prices start to jump quickly as you get into 12-16 or 24 port switches. For the time being, I’ll stack a spare TPLink 8 port 1Gbit switch on top of it, but will probably move to at least something like this in the not-far-future. Of course, if you can stick to 1Gbit, things are a bit cheaper, but still a bit tough to find that will also fit into a mini-rack, so I may also just wind up adding a second and then using the GBIC to chain them together. TBD..
-
2x 1U RackMod chassis- this isn’t going to work out for my plans, as it only holds ONE Pi in 1U on a 10” rack. Instead I’ll be doing an 8 slot 2U Pi rack, which is pretty awesome, but it means I wind up 1U short on height. Plan your rack ahead of time! I did but overlooked the 19” vs 10” variants on the Pi mounts so now will need to redo the rack height. -
3U NUC chassis. Once again, no perfect solution, but as one of my NUCs is a tall variant which is over 1U (1.75”) in height, stacking them sideways lets me use 3U ‘nicely.’ I could have probably done side-by-side on two of the NUCs, then maybe have found a 2U single NUC mount, but the vertical stack is nicer, although the author doesn’t provide STEP files, so will need to create two of the mounts from scratch. :-/
-
3 Lenovo Tinys to round up the bottom of the rack.
-
Finally, I’ll be adding some cable management and a small PDU and mount on the backside of the rack.
You can see the rack starting to come together to the right. I’ll insert the SBC 1U above the NUC chassis, and then wait for some keystone jacks and short cables to make it in while printing out the remaining pieces.

Closing thoughts
In no particular order…
Consider whether or not you will have/located/will build mounts attaching to both the front and real verticals. Most mounts for mini-racks do not, while it’s standard in datacenter equipment using full-sized racks. This may matter depending on the rack construction, e.g. if you only have nuts on one side of the verticals then want to mount something on the backside, it may cause some issues - or you may be able to swap the orientation in the rear. (I will probably need to do this on mine once I sort mounting the PDU).
At least on my rack, which uses cutouts and nuts as the backing, you can sometimes use a longer screw to help get the nuts ‘set’ into the rack nut holes, then use shorter ones for mounting the accessories. I used a LOT of M5x16 or M5x20s for mounting, but often needed to use a single M5x25 to help initially pull some of the nuts into the rail/chassis. Don’t worry if you only have longer bolts - unless your rack is unusual they won’t hurt anything, but may stick out the back of the rails a bit.
Once again - I’ve planned out and built entire commercial datacenters at one point in my career, and I still got burned by missing ’the fine print’ and needing to change to a different Pi solution, which needed 2U vs 1U. Do your best to plan out in advance how you’ll populate the rack, or if possible, print a rack type that allows for vertical expansion in the event you need more space, either as a result of a ’surprise’ on initial population, or simply adding more equipment to it later.