Introduction to 3d Printing and Getting Started
3D printing allows ‘normal people’ to create toys, functional parts, and more, while allowing engineers to do things like rapid part prototyping and more with advanced materials.
So - what is it?
There are really at least two types of commonly available ‘3d printing’ in the market today, although technically things like CAD systems fogr machined parts could also be considered in a similar domain.
For ‘most of us,’ there is FDM printing or resin printing. FDM stands for Fused Deposition Modeling, which is kind of a fancy way of saying bits of material are additively deposited to eventually create an object of some type. This is the type of printer most of your friends, kids friends, and neighbors have - if they have one, and will be the focus of this section of articles, at least for the time being.
The other semi-common type of 3d printing is resin printing, also referred to as SLA(Stereolithography) or DLP(Digital Light Processing), and uses UV light to cure liquid resin into solid objects. In general, it’s more expensive than FDM, doesn’t allow for multple color or multiple material prints, but may be used in some things like jewelry or miniatures intended to be painted.
How does it work?
The short version of this is that a 3d model of an object is created (don’t worry, there are thousands and thousands already done available for download!), and then sent to a ‘slicer,’ which ‘slices’ the model up in tens to thousands of inidividual horizontal layers.
That layer information is sent to the printer, which uses one or more ‘filaments’ (spool of material, like big colored fishing line), heats a nozzle or ‘hotend’ as needed to melt the filament, and then starts to print the first layer, followed by subsequent layers until you have a completed object matching the 3d model.
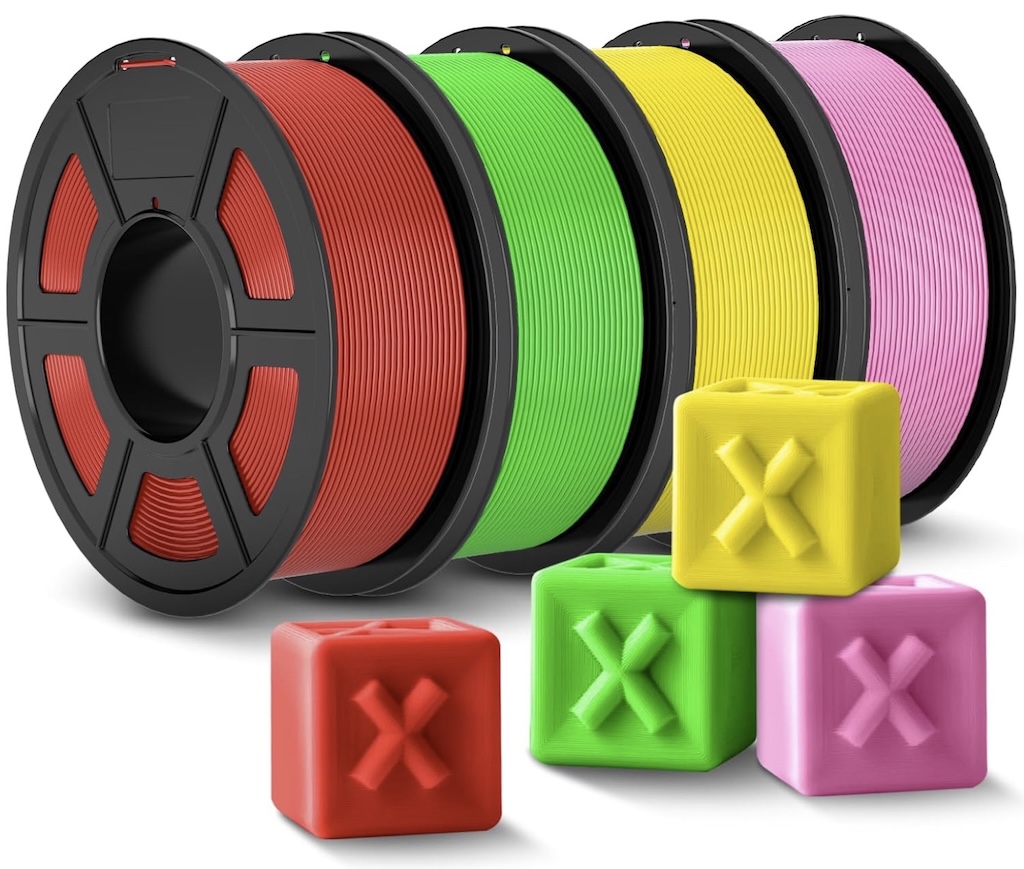
An example roll of filament is shown to the right. For the simplest materials they typically cost $10-$15USD for a 1kg spool, which has around 330 meters, or nearly 1100 feet of material on a single spool.
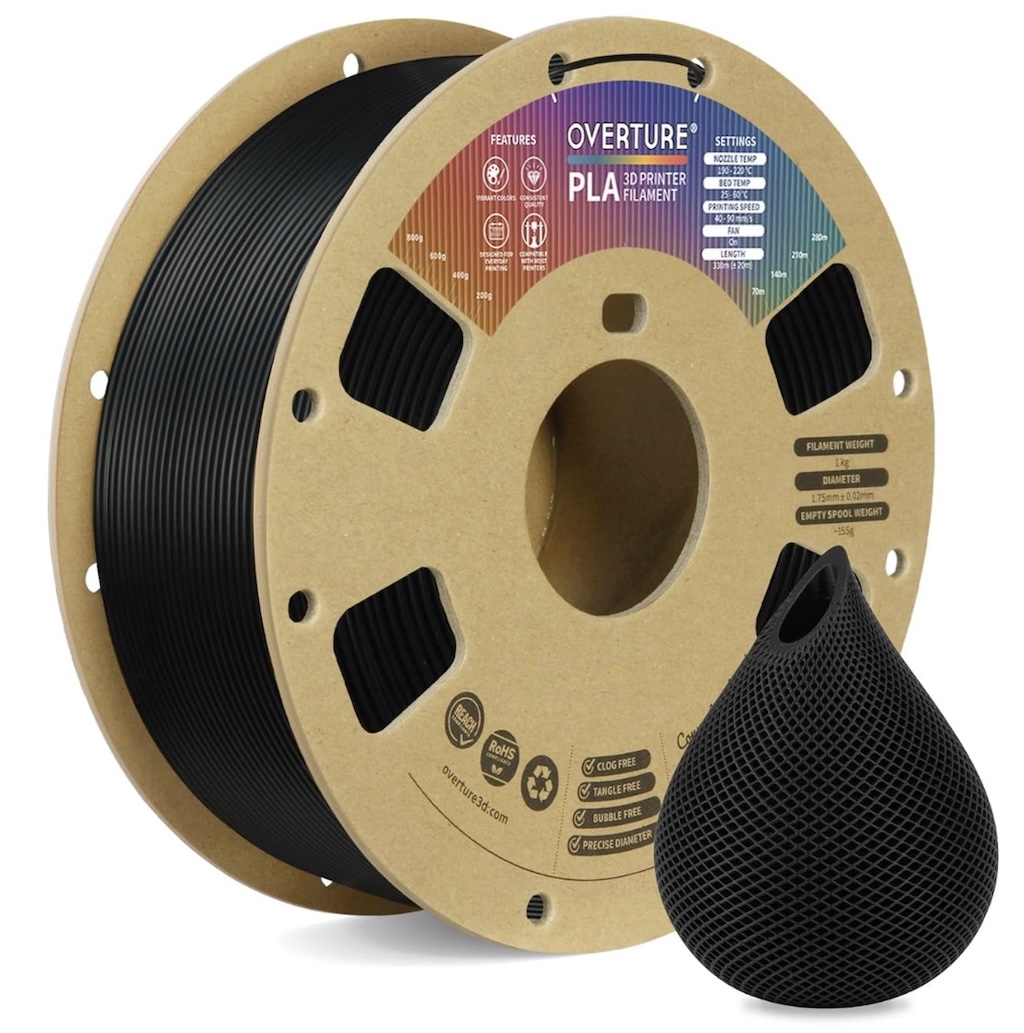
A spool of Overture PLA Filament with example printed 3d object
Well, ok, sounds like a lot, but how much gets used?
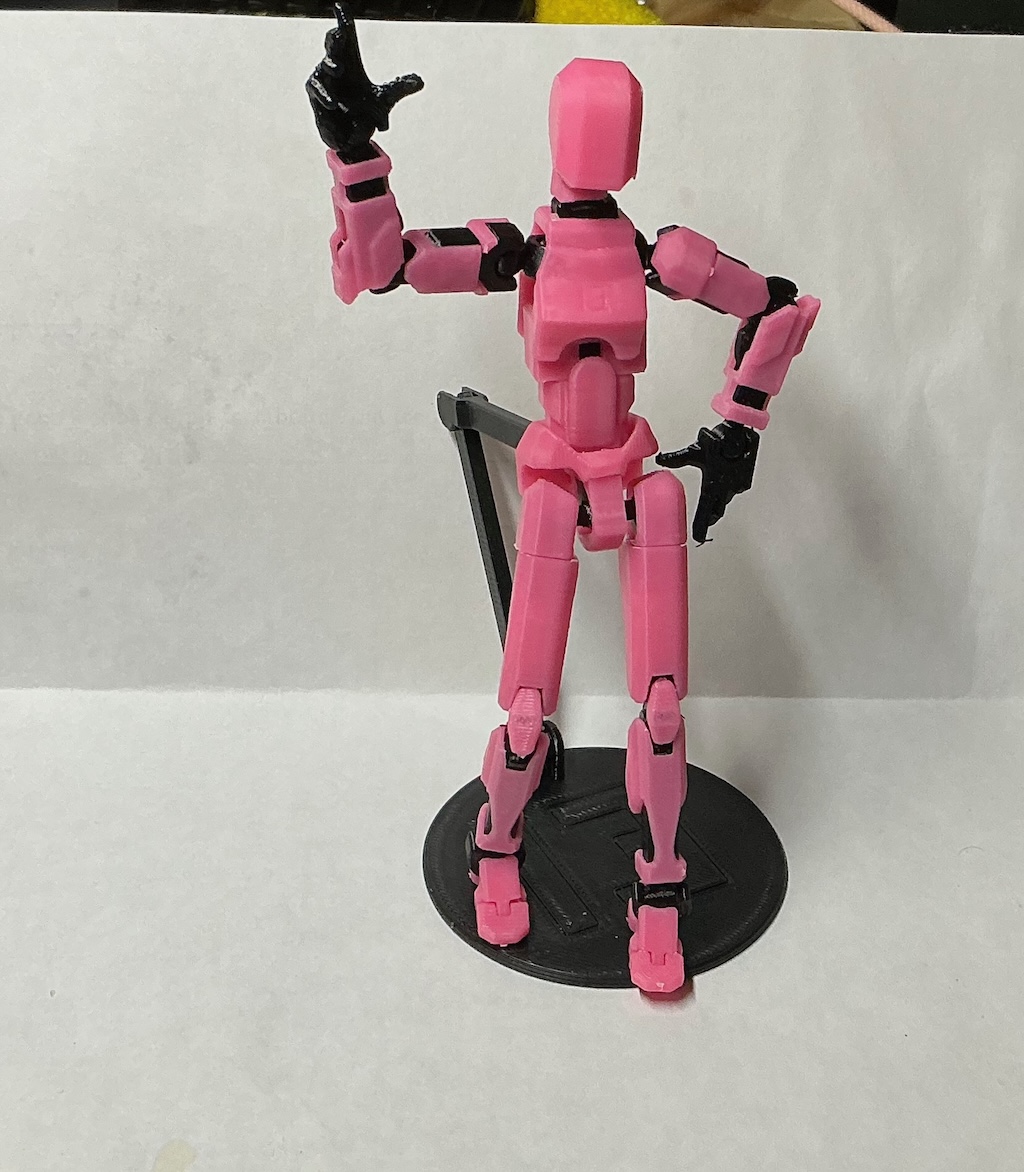
A picture of a toy I made for my toddler is to the right, using two different materials and colors. In total, it used around 31grams of material, and a total of 11meters (around 36ft). The figure is around 6” tall, fully pose-able, and filament cost in total was around 50 cents USD.
Of course, prints can be much more complex, and bigger, but some kids actually go sell kits of them - (this one is actually printed like a model and is put together) to other kids at school, or hand them out as part of a birthday gift bag, etc. Not too bad versus buying random $5 or higher bits at Target or wherever.
Things can of course get a lot more complicated, or simpler. Replacement for a toilet paper mounting bracket - no problem, a few cents. A small toolbox with dividers, a model of a circulatory system? Also possible. It’s really amazing when you think about how this really works by ‘slicing’ complex things into tiny layers, and printing it all out a tiny bit at a time.
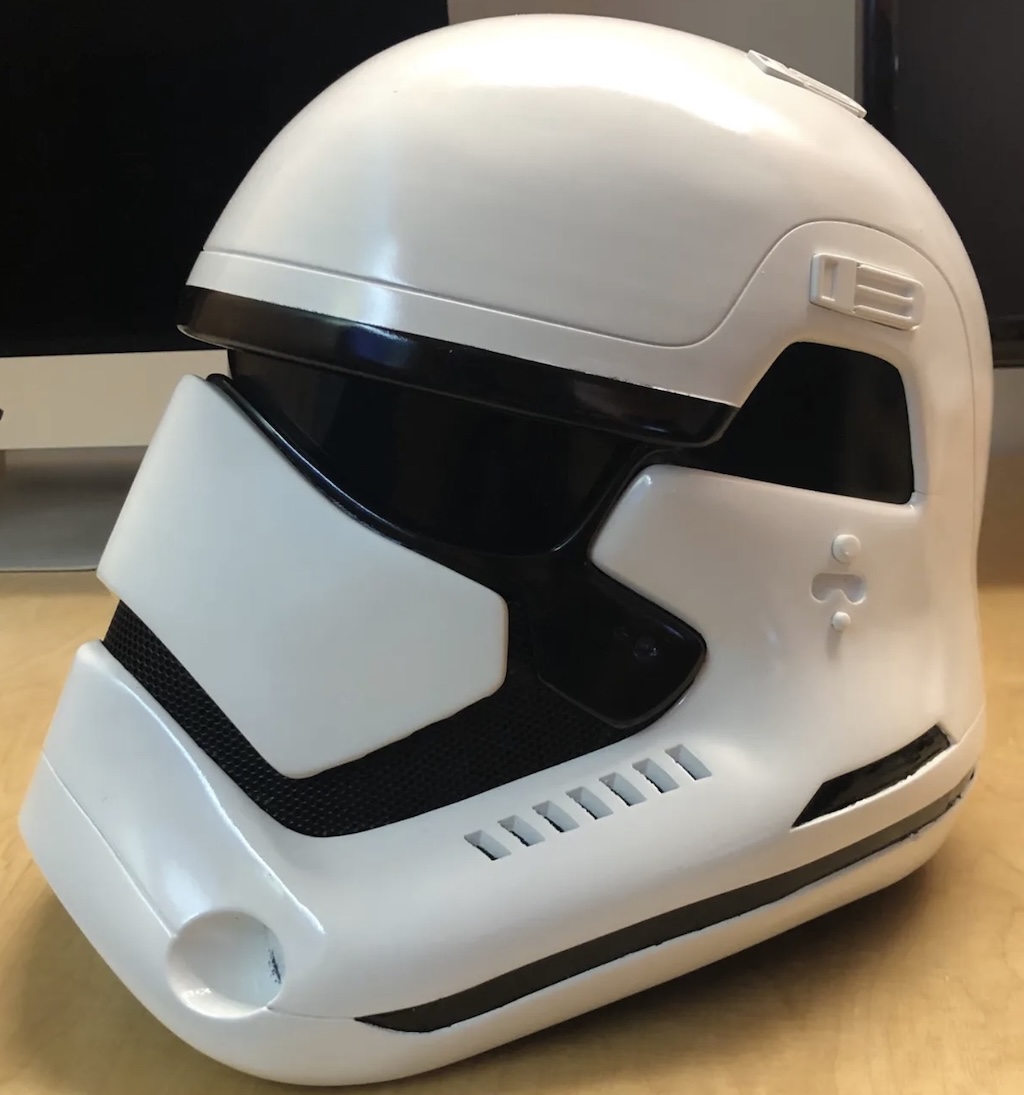
And yes, you can even do things like Halloween or cosplay helmets and more. You can see an example of a Star Wars Stormtrooper helmet to the right, but there really are few limits, assuming your printers ‘bed size’ (we’ll cover this shortly) is large enough, or in some cases, big models can be designed to be assembled from smaller parts.
There are some limits, or at least compromises. Doing multi-color or multi-material either requires a printer with multiple ‘toolheads’ or ‘nozzles’, which is more expensive, or requires unloading of one filament and loading of another on every color/material change, which may add a lot of additional time printing as well as some additional material waste. Some specific materials like nylons, and some engineering filaments (yes, you can even print things like RC car tires and gears) may do best on a printer with an enclosure and a filter system.
Don’t worry - we’ll cover each of these in some detail.
What do I need to get started?
The basics amount to this:
-
3d Printer
-
FIlament
-
a computer of some kind to run the slicing software
-
Slicer software - which usually is freely available with the printer or you can even use open source slicers
-
Misc Tools - you can print most of them but something like this is inexpensive and you will definitely use the brass brush.
-
Filament dryer and some vacuum bags for filament drying and storage
-
A stable surface for the printer. The more stable the better. I keep mine in my garage on industrial shelving.
Again, we’ll cover each of these in turn.
Printer Selection
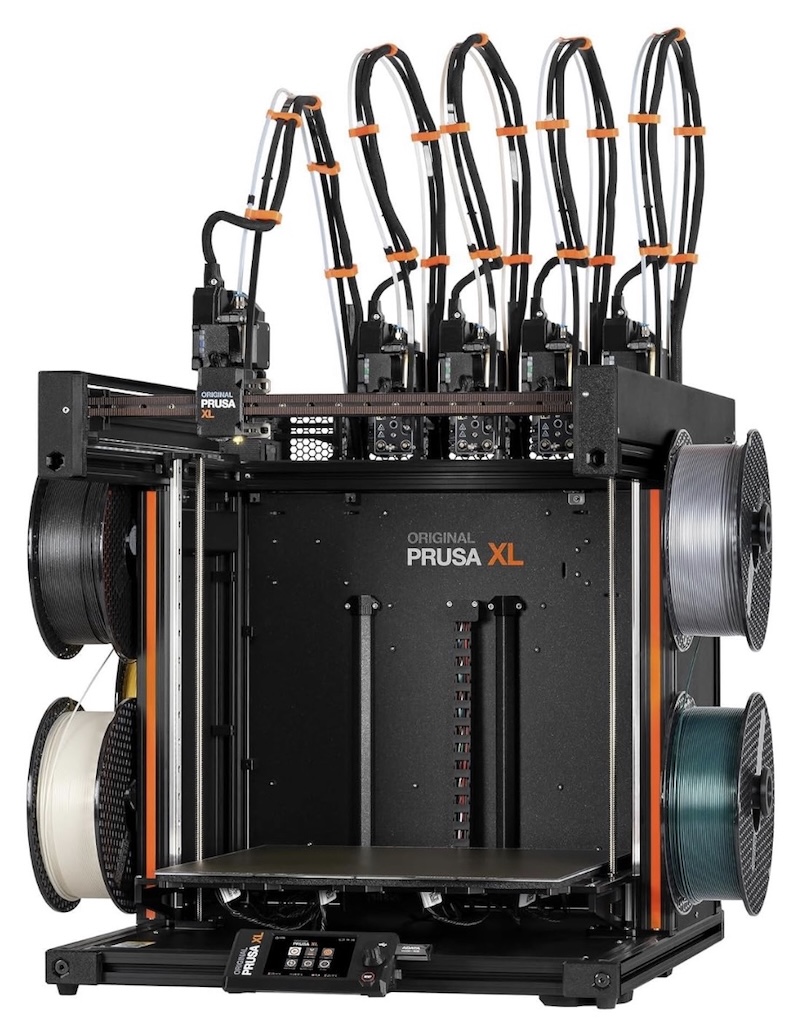
There’s a fair amount to this one. 3D printers can be bought from around $300USD on up into several thousands, or in the case of something like the Prusa XL 5 head printer -, over $4000 USD.
There are options more or less impacting the following:
-
print speed
-
number of nozzles or toolheads allowing much easier/faster handling of multiple colors or materials
-
ability to handle higher end materials
-
fully assembled or kits in some cases
-
bed slingers vs CoreXY printers (explained below)
-
build plate size and overall volume which impacts the largest item size you can print at a single time
-
various ‘gadgets’ like cameras, sometimes claiming to do detection of problem prints, or automatic bed leveling and others
If this is your first entry into 3d printing - do NOT look for a kit printer, unless you are highly experienced. Some of these can take a real-world 18-24 hours of time for assembly, assuming you get it all correct the first time!
3D Printer Brands and Starter Printers
There is an ever-growing number of them. I’m going to mostly focus on those that have been established for at least years with several models out there in real-world use.
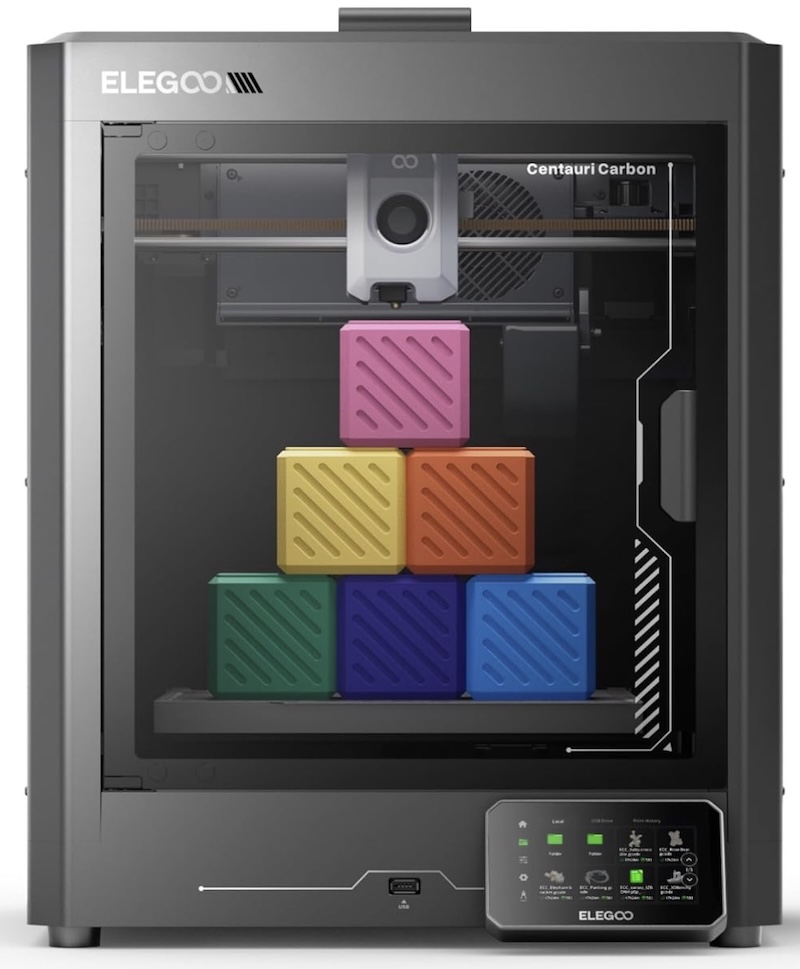
A majority of these are Chinese brands. Creality, Snapmaker, BambuLabs, Elegoo and others are all Chinese brands. One of the most popular outliers is Prusa Research, which is designed and manufactured in the Czech Republic/EU, and sources a majority of components from within the EU. This is not to say that none of the Chinese brands make decent printers, as some do, while the Prusas are at a bit of a cost premium. Having said that, long-term support is in question with many of the China-based brands - today’s ‘flagship’ printer may be mostly forgotten in 6 months when they launch the next model. This doesn’t mean the printer is immediately obsolete, as in many cases, there is a large online community for the more popular models including in some cases, how to fix or source parts in the event you need them and areunable to locate at some future point in time.
Prusa, by contrast, nearly always offers direct upgrade paths, sometimes for printers closing in on 10 years old, right up to converting them into one of the current models, and a majority of designs and software are open source, but you do pay a bit of a premium for this as well.
The two main kinds of 3d FDM printers are ‘bed slingers,’ in which the bed of the printer moves in and out and up and down, while the CoreXY bed moves only up and down with the printehad moving in the X and Y directions. CoreXY printers are nearly always faster with better accuracy in prints and also are often semi-enclosed from the manufacturer or much more easily enclosed via DIY or purchased enclosure options.
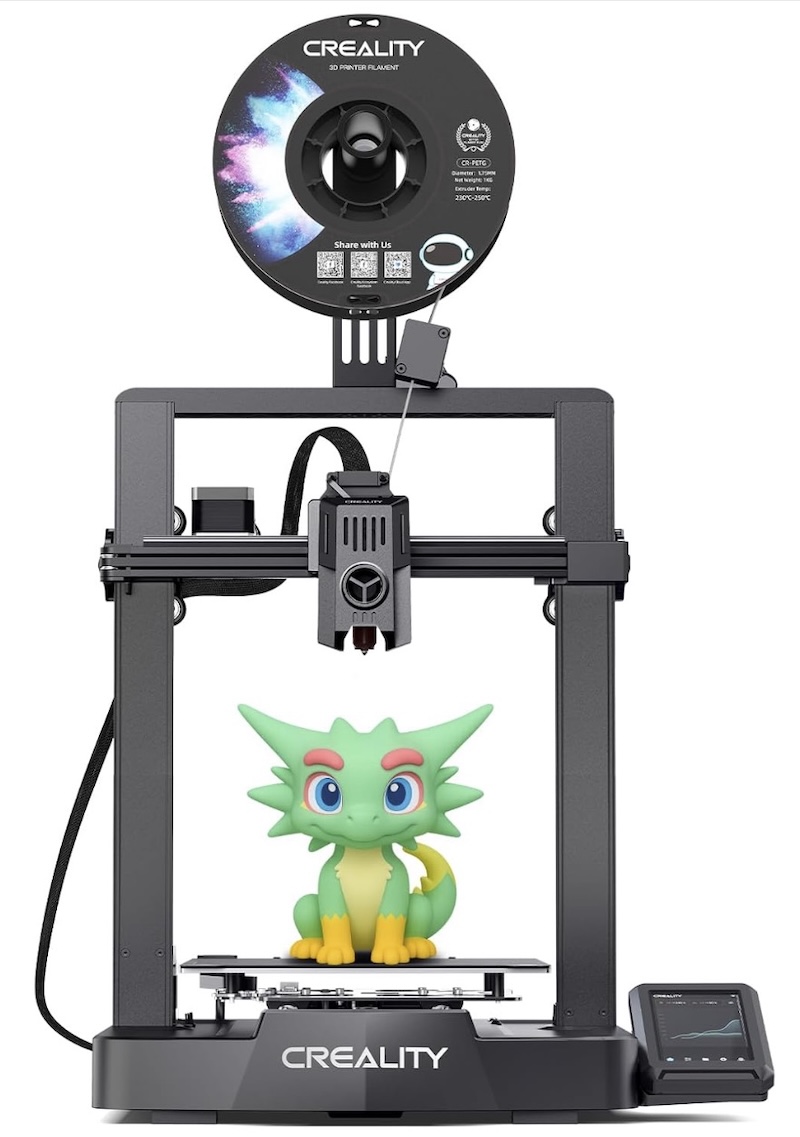
I’ve shown examples of each - the Creality Ender series has been around for a LONG time now., originally introduced in 2017, with the V3 coming out in 2018-2020 in various incarnations. A lot of people started on them, but not a lot tend to keep them longer-term. The image of the multi-color character being printed - well, you CAN do it, but note it’s got a single filament spool up top and single nozzle/hot-end, it will take some time.
The cost difference between something like the latest bedslinger Ender series and a lower-priced CoreXY is minimal, perhaps around a $20 difference between the Elegoo CoreXY with an enclosure and the Ender V3. Finally, many bedslingers also still require manual bed-leveling by the user, versus auto-leveling and probing. While I’ve worked on all kinds of things from programming vehicle ECUs to software, I along with I believe most others, would prefer more of 3D printing to be ‘using a tool which may be optimized’ versus it being a requirement for endless fiddling. IMO - do yourself a favor and start with a CoreXY with auto-leveling.
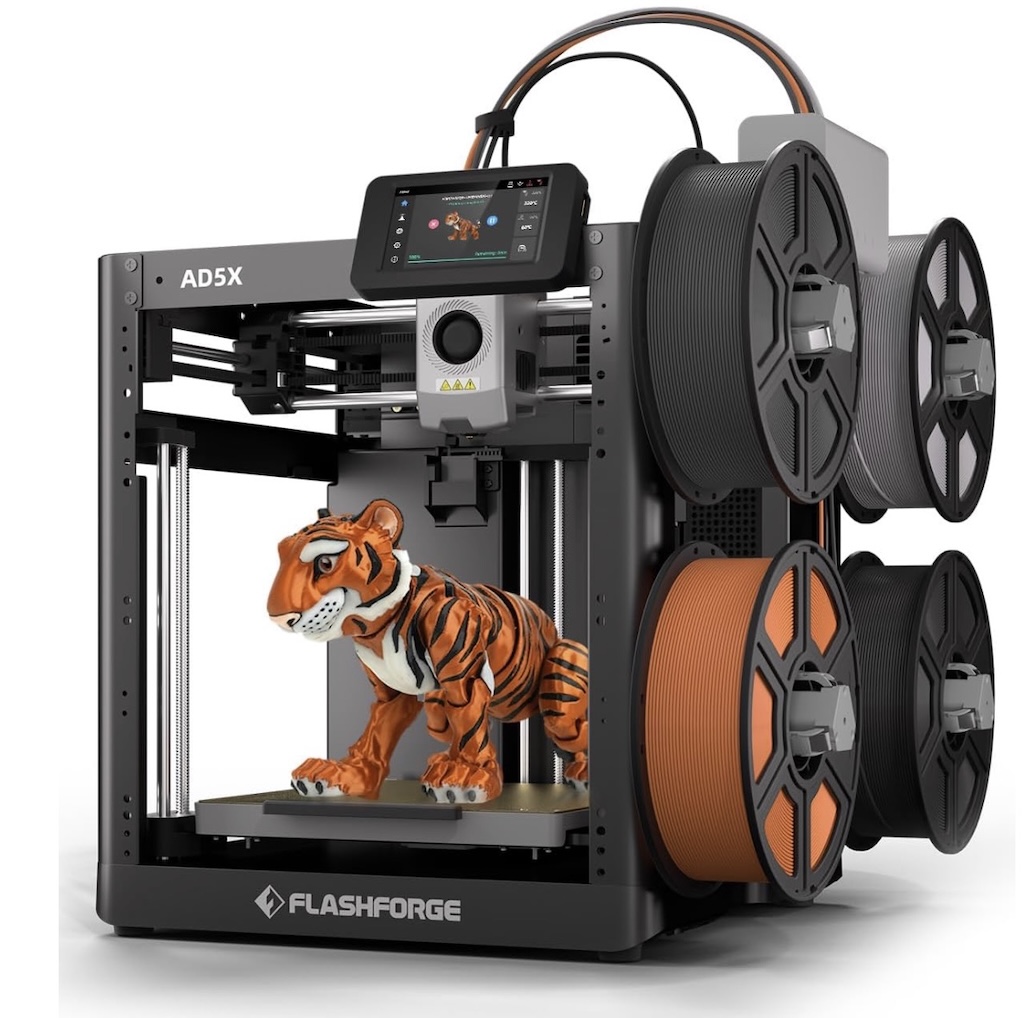
In a similar price range, the Flashforge AD5X is also decent. It isn’t enclosed but does have 4 filament spool cability out of the box, which other systems may charge hundreds of dollars for. You can add an enclosure to it - there are kits, but that also adds more cost.
At this price point I’d go with the Elegoo or possibly the Flashforge, knowing I’d want to add an enclosure to keep little one’s hands and dust out of the system.
More Advanced Printers (more expensive as well)
BambuLabs
So, this company has an itneresting history to it. On the one hand, they have done an overall great job of making some mid-to-higher-end printers that ‘usually just work’ like a good tool should.
They have spent a lot of money in overall advertising, getting units in hands of YouTubers, and the like, and building out their specifici model community site, makerworld.
They have been in contrast to some others who include or ensorse the usage of open source tools, very much trying to be a completely closed system, which is their perogative (by contrast even Prusa’s firmware is able to be replaced or modified).
However, they recently made some changes, including locking out various other printer solftware, including OrcaSlicer, which Prus has contributed to among many others, and they themselves based their slicer off of it (and I believe have yet to release source code as is required in this case), are forcing users into using their cloud software, and have baked ‘authorization control’ into their later firmware updates. As their printers are able to detect whether or not you are using Bambu branded filaments (and more expensive with questionable benefit for the added costs), this could conceivably do anything from locking out the usage of <your filament of choice>, force users into a monthly subscription model just to use their printer, and numerous other <not good for the consumer> types of practices.
They indeed do have some decent printers, but you’ll have to make your own call there. Just search online for ‘Bambulab controversy’ for more than you ever wanted to know., :-/
Other options
Things start to go up in cost relatively quickly here, as brands start adding on various systems to hold more spools of filament, cameras, and well, in some cases - who cares marketing ‘features,’ with some being more worthwhile than others. Many of the manufacturers love to call out their max nozzle movement speed as part of a ’tech spec war,’ but in reality, for anything but very fast protoypes you later throw away, most quality prints are intentionally slowed down, so it’s generally not a real-world useful benchmark for comparison, unless the numbers are extremely different between two otherwise similar printers.
In the mid-range there is another brand perhaps worth mentioning. Qidi has a decent lineup and the Qidi Q2 and slightly less expensive Q2C are well-priced, can take an add-on 4 spool box which also dehumidifies loaded spools, and looks promisiing at their ~$400-$500 price points.
In early 2026, however, I would be careful in jumping up in price without doing your research, as at the end of 2025, several announcements for new products were made making ‘multiple materials’ more affordable for many, and nearly obsoleting some of the mid to higher end flagship offerings by several companies.
Assuming you see a future where you’d like multi-material or multi-color printing and for it to be reasonably efficient and fast, most of the current higher end models over $1K simply won’t get you there. There are options like the Creality K2 Plus or Pro, which have reasonably sized print bed and come with their CFS system for adding 4 spools, but they still only have a single nozle/hotend, meaning multi-color or multi-material prints are going to be very slow and waste material as it changes colors or materials. If I were going to go down the mid-range path, Id give something like the Qidi Q2 Combo a try with their 4 spool system before one of the $1K+ Creality or Bambus at this point in time. It’s still single-toolhead/nozzle, but has a good build plate size, is reasonably priced and generally well-regarded, although once you’re over the $500 mark, I’d really be looking at the next printer for a bit more, the Snapmaker U1.
Snapmaker announced their U1, which is a 4 toolhead changing system, allowing up to 4 materials or colors to be used in prints with very little waste or additional time, and at a pretty amazing price of around $850. The U1 was a kickstarter project and is not quite ready for general ordering, but considering the Prusa XL 5 head is around $4000, and the Bambu dual nozzle H2D is $2000, the price alone is impressive. There are some shortcomings - it doesn’t have an enclosure or filtration system. It doesn’t have a sealed filament spool holder system. It uses pogo pins for the connections on the toolheads, which are probably real-world rated for 100-200K contracts, which seems like a lot - until you see how many swaps happen in printing a 4 color costume type mask or similar items. To their credit however, they do seem to be showing that part is user-replace-able and reasonably priced around $30 each, and in general, Snapmaker has an overall ‘ok’; reputation. There are tons of pre-release reviews on YouTube and in general - people like the printer. If I didn’t take a different path and it was available when I ordered my last printer, for the money - it’s worth looking at.
The other big announcement was a joint effort between Prusa Research and BondTech, with the latter developing a multi-nozzle changing system called INDX, which can do eight different materials and nozzles concurrently on Prusa’s current flagship Core One printer, and even more with their Core One L (larger print bed). The system has been demonstrated multiple times and an initial pre-order was done, with general available likely starting around the middle of 2026. The system can be user-installed to existing Prusa Core One/L systems and runs around $500, which isn’t inexpensive, but again relative to other solutions prices - it isn’t bad at all.
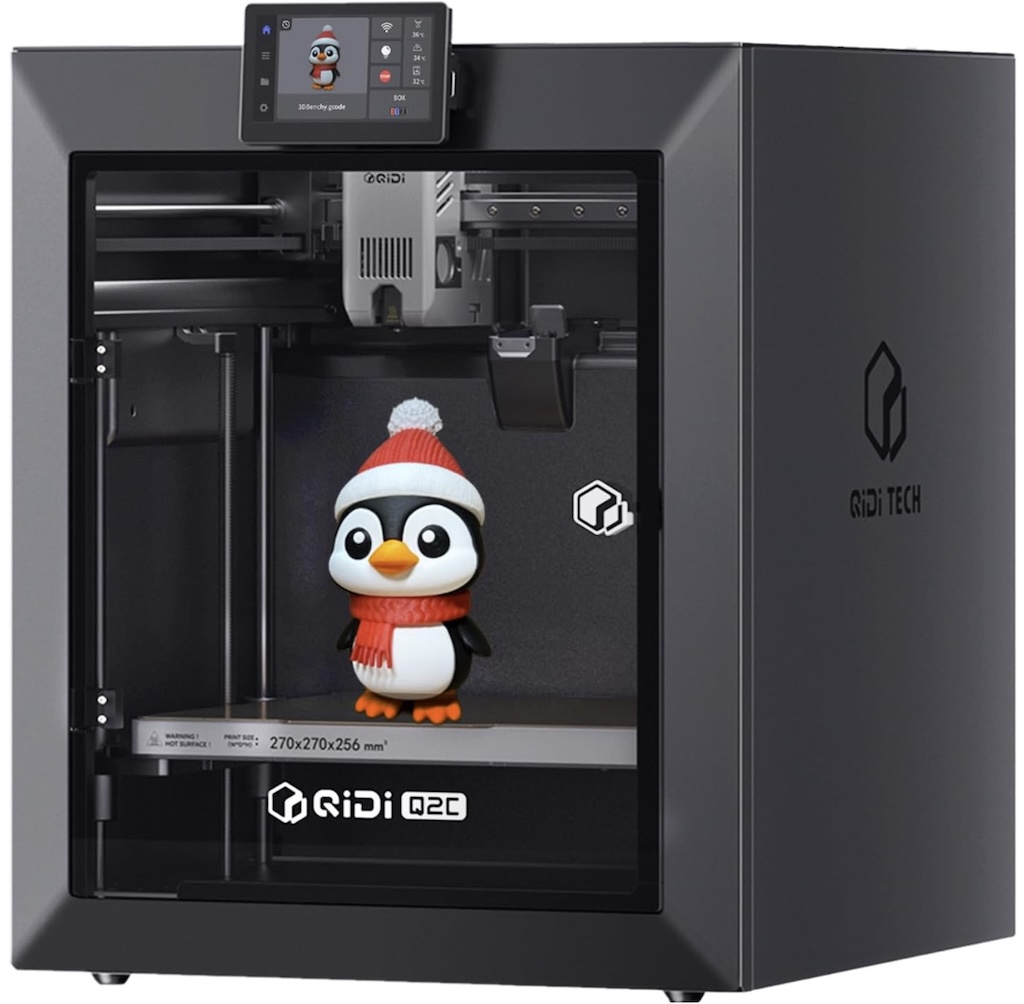
The Qidi Q2C and Q2 offer mid-range pricing with decent features
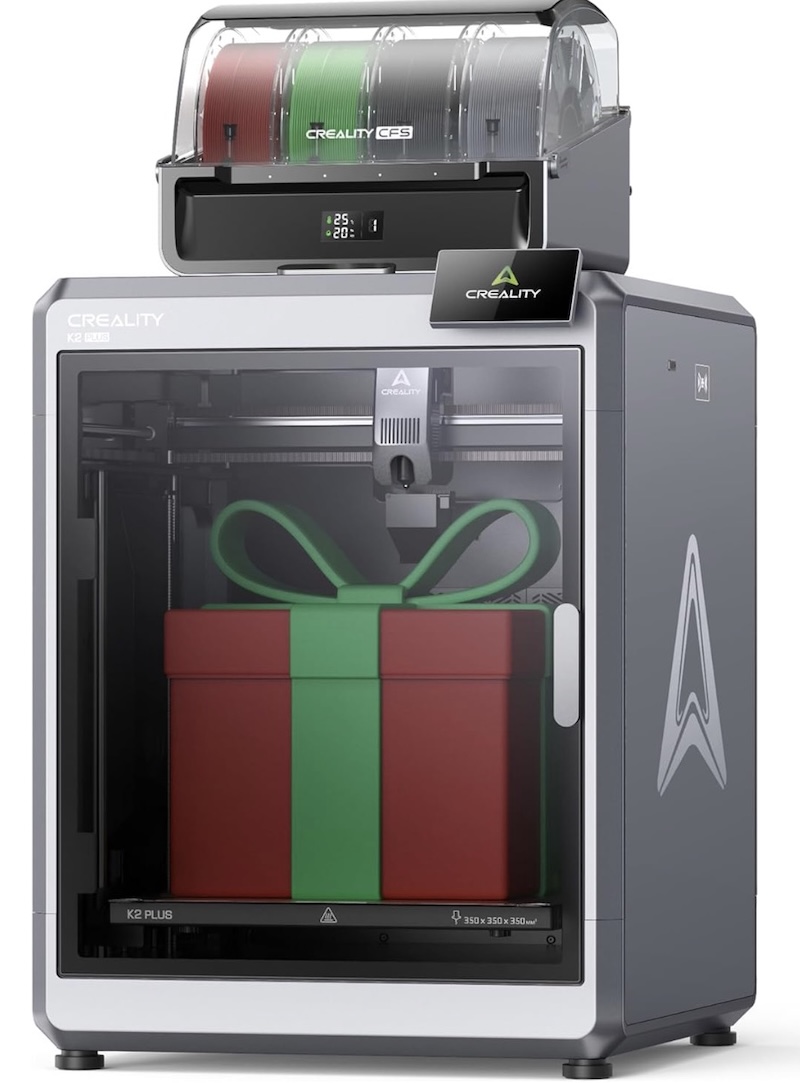
Creality K2Plus with larger print bed and their 4 spool management system
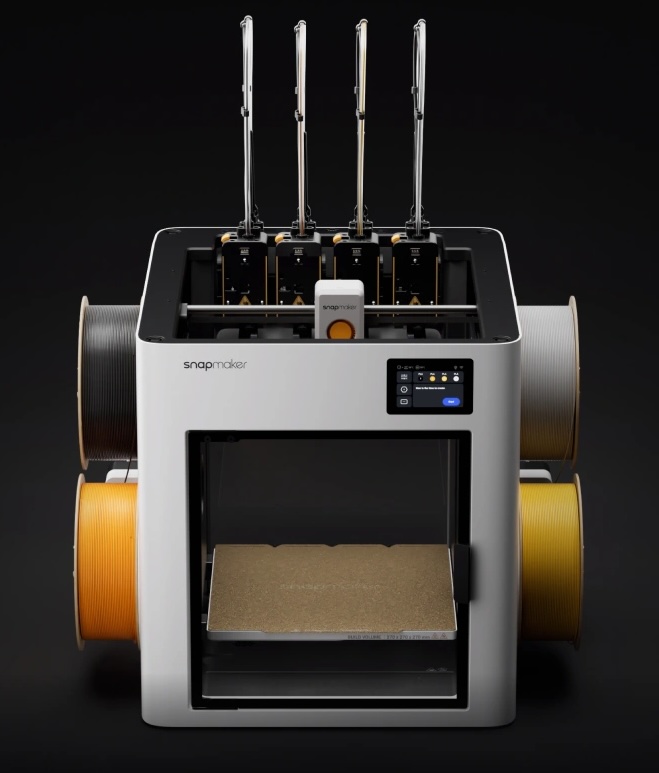
SnapMaker U1 4 toolhead printer
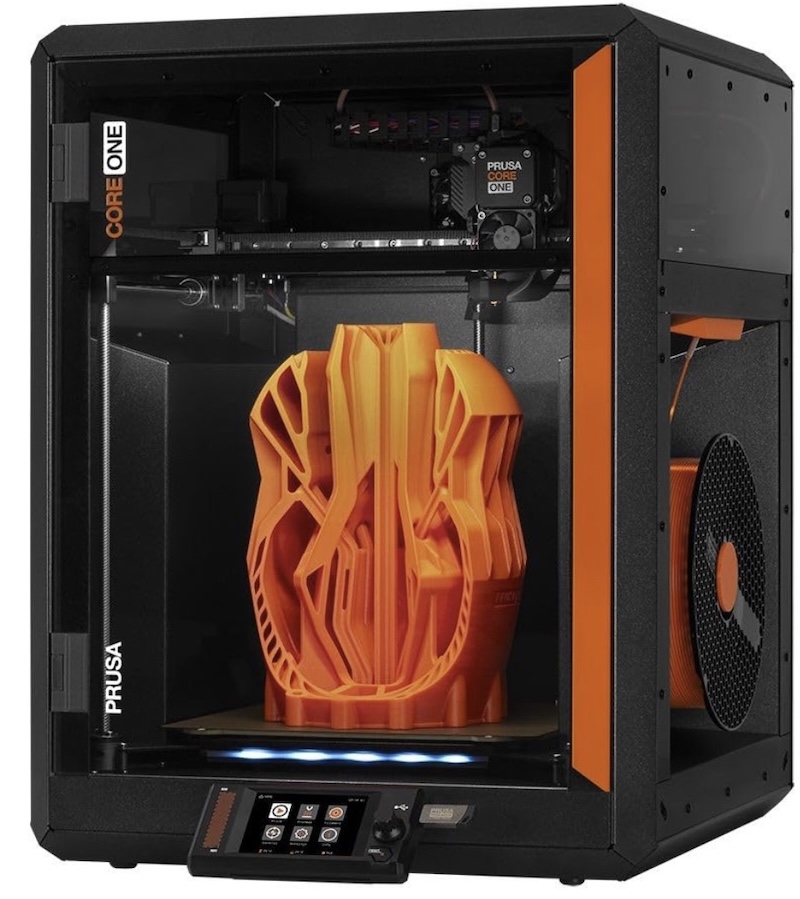
The Core One fully assembled runs around $1300, with the L variant being slightly more with a larger print bed and volume, but even with the INDX added, no manufacturers, including Bambu, really have a viable competitor here. The Bambu H2D 2 nozzle system has six less materials/nozzels available and is priced at $2K. Bambu must have scrambled as they released an ‘H2C’ which sort of has changing nozzles, but it’s much slower and still has a fair amount of waste in it’s changes, and it’s even more money at $2400. I expect the H2C to be a very short-lived ‘flagship’ as they try to compete with the INDX system. In full disclosure, my decision was quite easy between the H2C or a Prusa model - you can search for the demos as well as youtube performance of the H2C in time and waste, plus the ‘controversy.’ I went with a Core One L and am waiting for the INDX release currently.
One more word on printer ‘gadgets'
Filaments
There are a lot of filament choices, and even more companies offering them. I have not personally tried all of them, and as a beginner, there are a few which stand out as the ideal initial set. Some of the different types available are listed below, but note especially on the more advanced types these continue to be added to over time.
-
PLA - Polylactic acid, dervied from cornstarch or sugarcane, literally biodegradable, easiest filament to print, and comes in tons of colors. Not as durable as others and may be somewhat brittle, but a solid starting inexpensive filament.
-
PLA+ or PLA Plus or PLA ‘Pro’ - these are all PLA based with some amount of additives by the manufacturer that generally retain the easy printability while adding a bit more temperature resistance and durability. Some are better than others, with most being very close in cost to ‘pure’ PLA.
-
PETG - Polyethylene Glycol. Sometimes a bit more difiicult to print, has additional strenght and temperature resistance and is less briottle compared to PLA. Is claimed to be similar in composition to water bottles and is said to be ‘food-grade,’ Useful for light use tools, containers, and things needing more durability than PLA or PLA+.
-
ASA and ABS - Types of thermoplastics, generally significantly stronger than PLA/PLA+ and PETG, with ASA also being more UV resistant than ABS. Can be used to make functional parts including some automotive exterior parts. Both ABS and ASA should be filtered our routed to outside air.
-
TPU - Thermoplastic Polyurethane. A durable flexible material, which can be used to print phone cases, shoe insoles, gaskets, and all kinds of things requiring both durability and flexibility. Does have some emissions during printing so probably should at least be filtered, but lower emissions compared to ABS or ASU. There are numerous other types of ‘flex’ material out there for 3d printing as well.
-
Nylons - there are various such as Nylon ^ and Nylon 66, as well as bio-degradable Nylon 610. In general, ASA has better UV resistannce while most nylons offer even more added stranght and durability.
-
Carbon Fiber and other additives - Many filaments offer ‘blends’ as well as things like carbond fiber strands being added, or even wood for a wood-like looking PLA, while Carbon Fiber adds more strength to the base filament material. Other additives conitnue to evolve and become available.
That’s - a lot!
Yeah, it is, and keeps growing, but here’s the thing. Starting out, pick a brand of either PLA or PLA+ and a brand for PETG, and start there. SOme people literally never use anything other than basic PLA. The female robot model I put a picture of and a link to previously was printed in black PETG for the inner core and pink PLA+ for the outer parts, and that’s it.
How much filament do I need?
Well, that really depends on your plans. Consider not just types but also colors, noting that I would not start out of the gate with multi-color printing, but doing a single color print in your color of choice is simple.
If you expect to be doing different color prints, some manufacturers also offer multi-spool discounts.
Personally, I’d start with a handful of black PLA or PLA+ and PETG, and the select some individual colors in PLA or PLA+ based on your thoughts of initial prints - you can always browse Printables.com for inspiration. Once you start looking, you’ll probably be amazed at the number of things you start to save off!
Brands I like in general that others hold in reasonably good regard are Overture, Jayo, eSun, and Sunlu. Others are good, like Polymaker, Prusament, Jessie and others, but tend to also be a fair amount more expensive, so starting out it makes sense to go with ‘readily available and not expensive,’ although later, especially as you may decide to try more ‘exotic’ filaments, you may develop your own preferences.
I’m mentioning several of black, just as it’s the basis of a good number of prints for me including a small toolbox for the printer, the color of the underlying ‘frame’ of the positionable dolls, and all kinds of miscellanous things. You may select another ‘most often used color, but I’d start with a few spools of the Black PLA+, one or two spools of PETG, also in black, and then select single spools of a few colors in PLA or PLA+. You can get them in < 1kg spools, but unless you really have a single use for a given color - it’s better and cheaper by the amount to do the standard spool sizes.
Filament Drying and Storage
This one has some people in different climates in all kinds of debates. The reality is that most filament types are hygroscopic, that is - they will absorb water over time. Some types like TPU are almost sponge-like, while PLA may take a while longer before absorbing significant moisture, but it will given enough time. Filament usually comes in a single or multi-use sealed bag along with some dessicant, but even then, sometimes you may want to dry filament direct from manufacturers as they can be unsealed/puncutred in transit, or just wind up with a batch with more moisture than others. When ‘wet’ filament is used, it can cause popping in the hot-end while printing, causing chaos in your prints, additioinal strinigng and less detail looking good. In short, but expecially if you live in even a somewhat humid area OR might leave some spools around for months - you should at least invest in a filament dryer.
The good news - and the bad
There’s both good and bad news regarding filament dryers. They’re relatively inexpensive is the good news. They bad is none of them are ‘perfect.’ Most of them do much better with community-added minor modifications, but they’re (mostly) pretty simple. They are also pretty simple devices, and some have tried to use food dehydrators, but bear in mind - I wouldn’t use a food dehydtator with ASU or other materials and then use it again for food personally.
I’ll do a different article with a deep dive on filament driers, but the short version for single to low color manual printing, I like the PolyDryer (also rebranded by Snapmaker, sometimes slightly cheaper than the Polymaker branded version but completely interchangeable), with a few extra storage boxes (they can be printed directly out of), and some vac-sealed re-usable bags with dessicant for ‘extras’ and longer-term storage.
You could also do something like the Sunlu S1+ along with the vac-sealed bags.
Other bits
Not much really. You should have the small toolkit mentioned previously or if one comes with your printer, great.
You’re going to want some 90% or better isopropyl alcohol and some KimWipes or a microfiber for cleaning the print bed before and after each print.
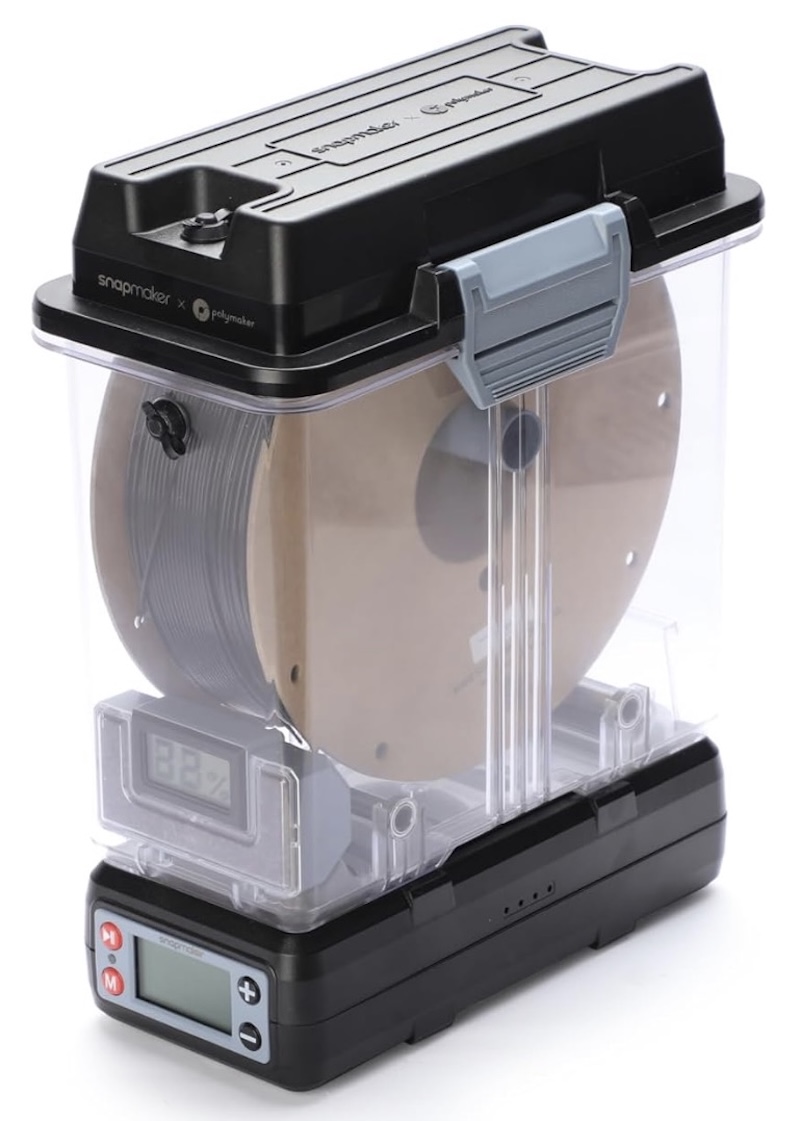
The Polymaker PoilyDryer, also rebranded by Snapmaker